
How Microsoft Power Platform is helping to modernize and enable...
In this webinar, our experts showcase a variety of demo use cases of how different components of the...
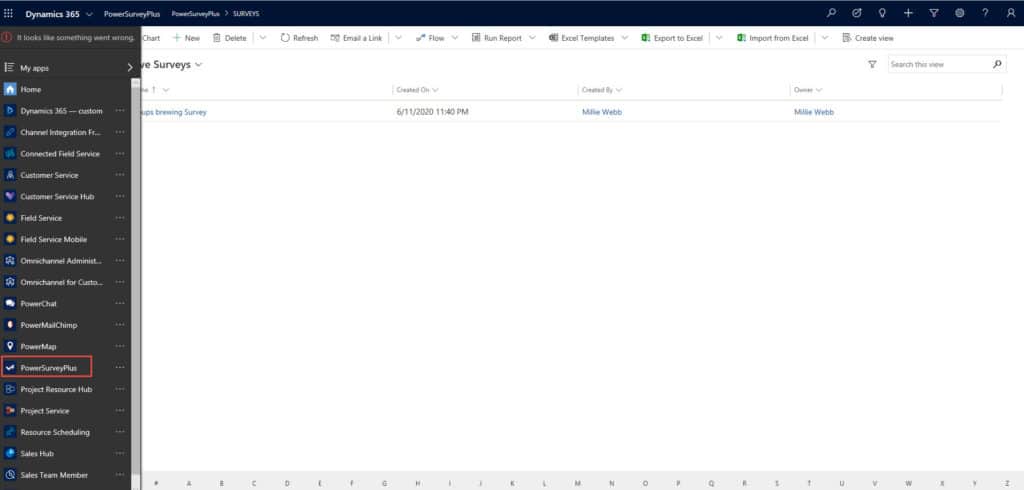
To use PowerSurveyPlus in the Unified Interface (UCI), we’ve created a model driven app. You will need to use PowerSurveyPlus through this model driven app in order to experience proper functionality. The model driven app is included in versions 1.4.0.90 and above. When you install a version above 1.4.0.90, you will notice a new PowerSurveyPlus app in the UCI:
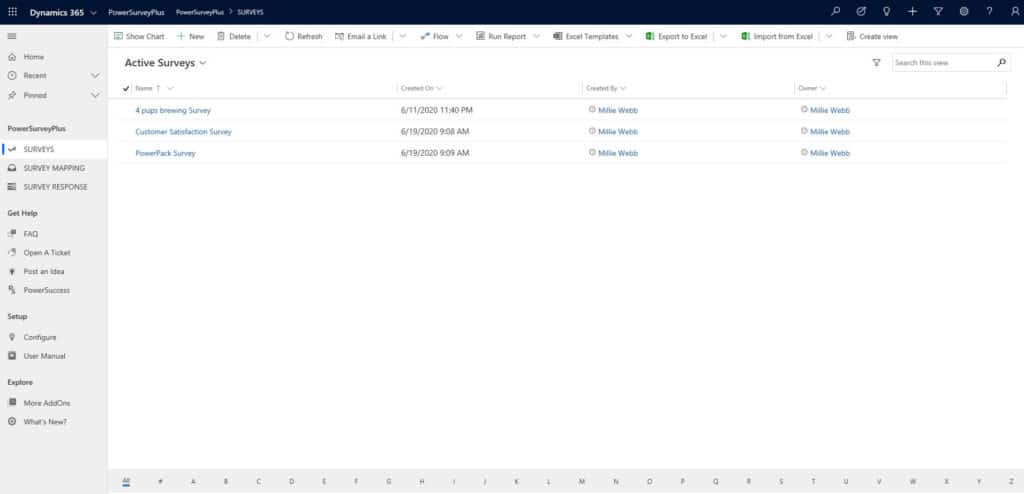
Once you open the PowerSurveyPlus app, you will notice the PowerSurveyPlus components (Surveys, Survey Mapping, Survey Response), along with the following sections:
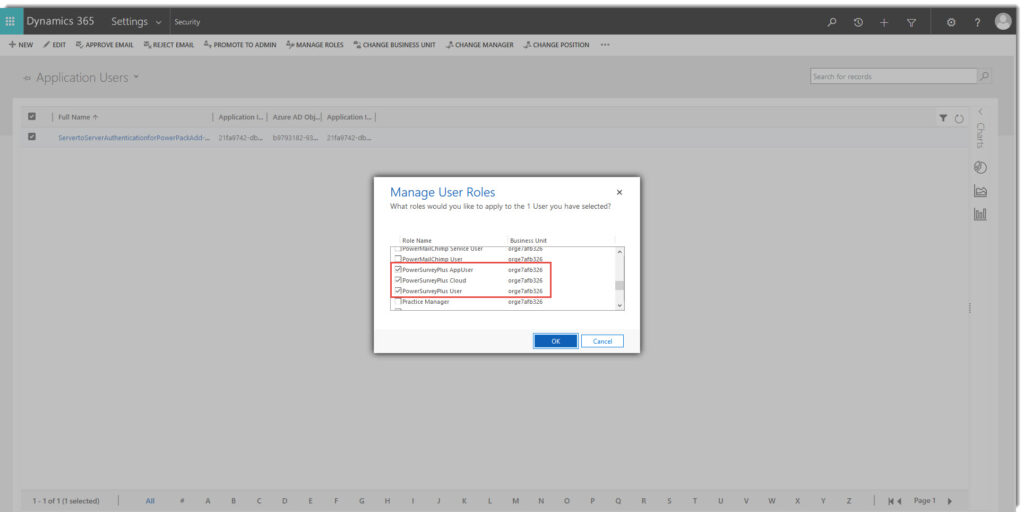
After you import PowerSurveyPlus, you will see several new security roles in your Dynamics 365 system. The user who is entered in the PowerSurveyPlus configuration will need to have the PowerSurveyPlus Cloud User role assigned to them. Users who you wish to view and create surveys need to have the PowerSurveyPlus User security role assigned. They will also need to be assigned the PowerSurveyPlus AppUser role to access the PowerSurveyPlus model driven app. System Administrators will automatically be able to use PowerSurveyPlus and no additional security roles are required.
If you are using server to server authentication, the above roles will need to be applied to your app user, along with a role that allows you to read/write (for example, a sales admin role).
Once PowerSurveyPlus has been imported and registered you will have to choose the Target Service you would like PowerSurveyPlus to be hosted through, within the solution. PowerSurveyPlus users have the option to choose from four different Azure clouds; Central US, East Asia, West Europe, and Southern Brazil. Once you have selected your target service make sure that you select Save before navigating away from the screen.

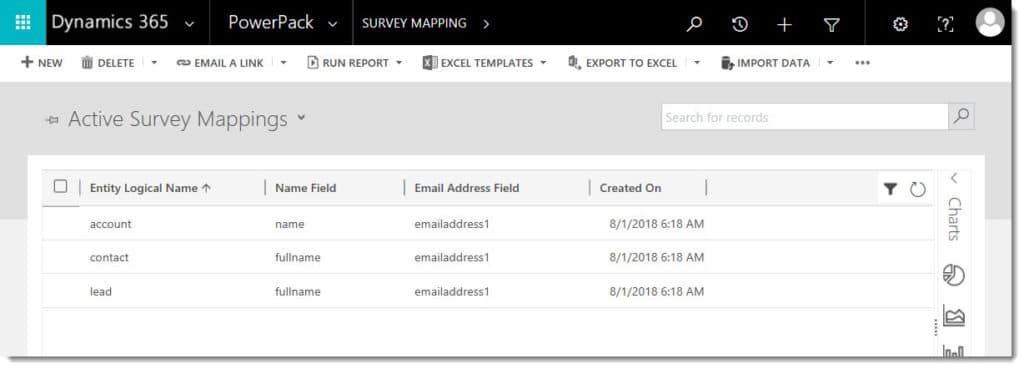
After importing the solution, you will see a PowerPack tile added to your sitemap, with a few different PowerSurvePlus entities within it. Survey mappings tell the survey activity where to pull the name and email address from, for the record the survey activity is set regarding. Lead, contact and account entity survey mappings are already set up for you, but if you'd like to send surveys and set the regarding of the survey activity to another CRM entity, you will need to set up a survey mapping for that entity. The Entity Logical Name, Name and Email Address fields must have the entity/field's schema name, in order to function properly.
To use PowerSurveyPlus, one of the two below forms of authentication is required. From November 9th onwards, PowerPack add-ons will be supporting ServertoServer authentication (recommended and supported for CRM online) along with IFD authentication (supported for on-premises). If you are on version 9.1.0.23474 or above of Dynamics 365, you will not be able to authenticate using username and password at all. Instead, you will be required to use ServertoServer authentication, as Microsoft turned off authentication using App password starting with this version.
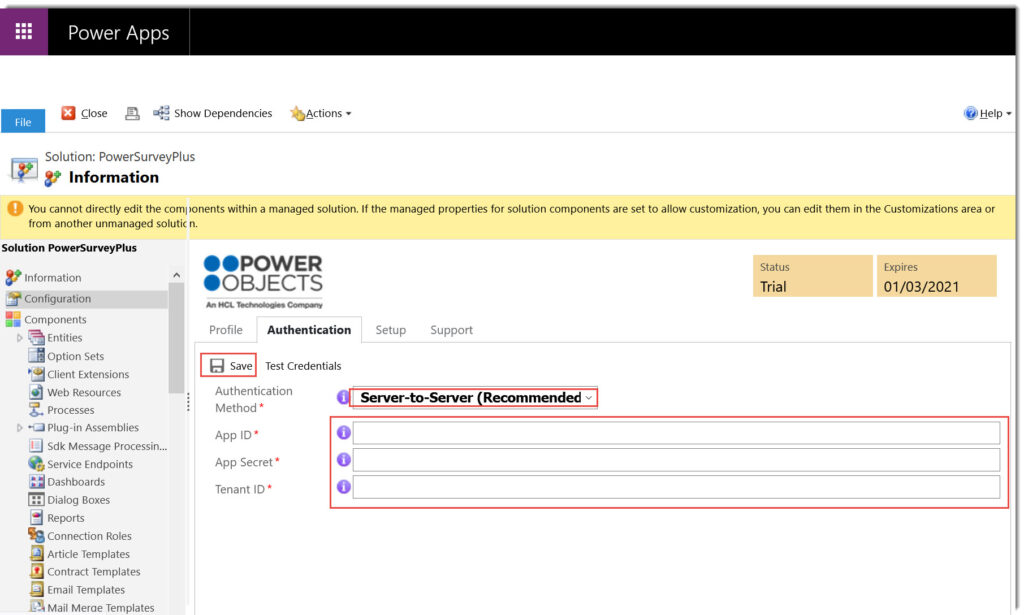
Configuring PowerSurveyPlus using servertoserver authentication
Check out this blog for instructions on how to set up servertoserver authentication. Then, navigate to the PowerSurveyPlus configuration page authentication tab, and select “server-to-server” as your authentication method. Add your App ID, App Secret, and Tenant ID, and click on “save.”
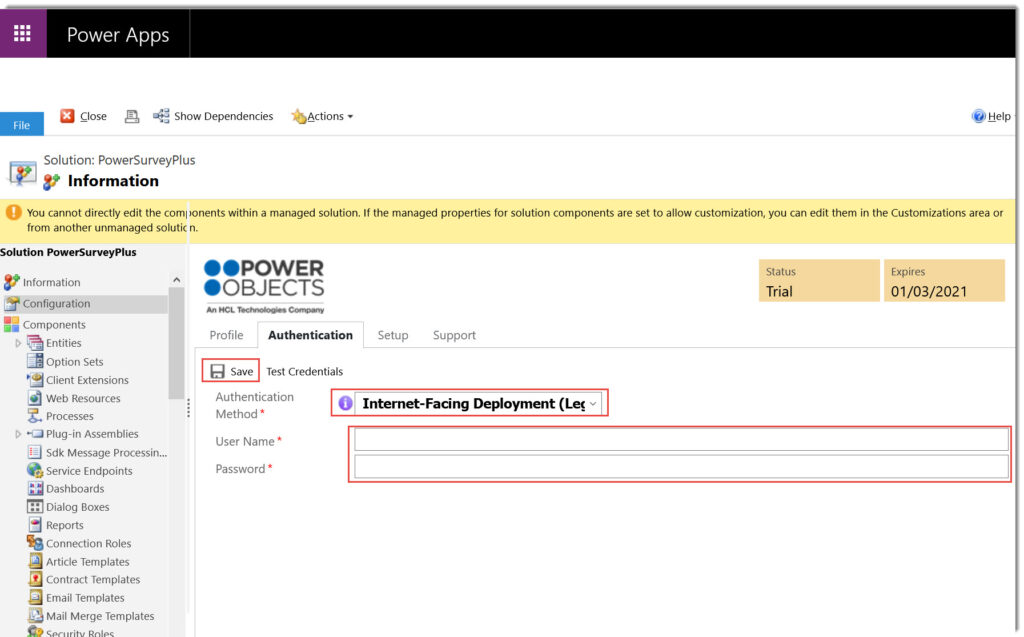
Configuring PowerSurveyPlus using username and password
If your CRM is on-premise or you have a version of Dynamics 365 online that is below 9.1.0.23474, you can still authenticate using username and password. If you have MFA enabled, you will need to create an app password and then enter in your username and app password into the PowerSurveyPlus configuration page as usual
To start creating surveys, navigate PowerPack > Surveys and select New. Proceed to fill out the details of the Survey Form, when completed press Save.

The Name field is a required field, which allows users in CRM to differentiate each survey created. The survey should have a logical name as it will most likely need to be referenced in the future; it should also not be too complex as it will be used to programmatically call this survey.
The text entered here will be the survey hyperlink text when the survey is emailed from CRM.
By selecting a CRM Campaign, a campaign response will be created for each survey completed.
Enter the email address you wish to have survey submissions emailed to.
You can choose to change the Back, Next and Submit button text.
If you would like to put a time limit on when a survey must be answered by you can use the Expiration Date field. Whichever date is denoted in this field will become the survey’s expiration.
If you have setup a survey with an expiration date, you will need to enter an Expired Survey Message. This message will be displayed when a respondent clicks on a survey after the expiration has passed.
If a survey has already been responded to and the respondent forwards or tries to click the survey link again the text entered in this field – letting the respondent know that they have already completed the survey.
When a respondent submits a survey, they solution will automatically refresh their page that informs the respondent that the survey has been completed and successfully submitted. You will want to use this field to write out that messaging.
The text displayed when the Jump to URL is converted to a hyperlink.
The URL entered in this field will be placed on the Survey Completed screen, the actual URL will be hidden behind the Survey Link Text.
Under the CSS section CRM users are able to copy and paste their own CSS. Adding CSS will make the survey look more custom and fit the organization’s branding. If you choose not to use CSS the survey created in the designer will have default styling.
After a survey has been saved, a button labeled Design will appear on the ribbon allowing you to open the designer. The designer allows you to drag and drop the elements of the survey onto the page.

Selecting the Design button will open a new tab in your browser and display a blank survey. Before you begin building your survey it will be helpful to understand the individual parts of a survey in PowerSurveyPlus.
All surveys must have at least one page, if users would like to create multiple page surveys they can do so by adding additional pages. Pages contain sections, which contain the actual questions. When creating a page users have the following options:
The name field will be displayed at the top of the designer as a tab. This field just simply serves the purpose of being an identifier of the page you are working on in the designer. It will not be shown on the actual survey being taken by respondents.
The header field is a section where you can add a label or title to the top of the page, by default this text is centered and bold.
The sub header gives more space for text. The sub header is displayed directly underneath the header field and is centered by default.
The paragraph section gives users the ability to add multiple lines of text to the top of the page. The paragraph is displayed under the sub header field and is aligned to the left by default.
To add a footer to the bottom of the page use the footer field. The footer text is displayed at the very bottom of the page and the text is aligned to the left by default.
If you would like the page to be visible by default you will want to make sure the Visible check box is checked. If you are using the page with an expression you will want to have the visible check box unchecked. For more information on expressions please jump to the Expressions section.
If you would like to reuse the current page for other surveys you will want to make sure the Make Template check box is checked. If you do not plan on reusing the page you will leave the check box unchecked. For more information on templates please see the Template section of this guide.

Once you have selected Save the following fields will look like such on your Survey Page:

Sections are an important part of PowerSurveyPlus; this is where users will create their questions. Sections can be useful for grouping questions by subject matter and can be made visible or hidden based on the answers previously answered. For more information on how to make sections visible or hidden please see the expressions section of the guide.
A survey can have multiple sections on one page as shown in the screen shot below:

Another useful piece of functionality for sections is that they can be made repeatable. A repeatable section allows users to copy the section repeatedly throughout the survey, so they can add additional information for the same question. An example of this would be “Job Experience,” people will likely have had multiple jobs in the past, by making the section repeatable they can enter each Job Experience without the survey designer having to denote how many Job Experiences they want the survey respondent to be able to enter. All the questions within a repeatable section will appear again in the new section. Repeatable functionality is only available for sections.
Users can add hyperlinks to the text fields of the page, section, or question settings by selecting the link icon in the upper right corner. Enter the link text and the URL, when completed a hyperlink will be placed where that cursor was located.

Questions are the heart of the survey. Questions can only be placed inside sections, they are not placed on pages directly. Like Pages and Sections, Questions can be made visible or hidden based on the answers to previous questions in the survey. For more information on visible and hidden questions, please see the Expressions section of this guide.
A checkbox is used when a question requires one of two possible answers. The check boxes may be left checked or unchecked. If the question is set as required, by default, it will be displayed as the “unchecked” value.
A clock time question would be used if an answer requires a.m. or p.m.; or if the answer needs to be in hours and/or minutes. The clock time question is displayed in a 12 hour format; not a 24 hour format.
A date question would be used when looking for an answer that requires the entry of a particular day.
Dropdown lists are used when there are multiple choices and the respondent can only choose one. Enter one answer choice per line.
Matrix questions have rows and columns of possible responses, allowing respondents to rate multiple options in order of importance.
A dollar question would be used when looking for an answer in dollars and cents. This question is, by default, asking for US dollars (Example: $34.54).
Multiple checkbox question types are used when there are multiple answers and the respondent can choose more than one. For the answer choices, list one per line.
Multi-line text boxes are used when looking for an answer that would allow the respondent to type free form text; typically a sentence or more. If you choose a multiline textbox as the question type respondents will have the ability to input up to 4,000 characters.
A numeric question would be used if looking for an answer with a numeric value.
A radio button question is used when there are multiple answers but only 1 answer can be chosen. List the options in the Choices text box one answer per line.
This type of question should be used to return a numerical answer with a value of 1-10. Remember to add the Low and High description – this will minimize confusion on what a 1 means, and what a 10 means when people answer the question. There are 3 types of rating displays to choose from, radio buttons, stars, or smiley faces.
Use a text box when looking for a short free text answer to a question.
The stop watch time question would be used when looking for an answer in hours, minutes and seconds. (Similar to the display of a stop watch).
To add a page to the survey click on the plus sign shown in the top left corner of the designer. You can edit the data on a page by selecting the page tab that needs to be edited and clicking on the gear icon. If you need to delete a page select the page tab that you want to delete and select the X icon.

Once you have created your pages, you can add sections to each page. To add a section simply select Section/Group from the right side pane and drag the section onto the page and drop it.

When you drop the section on the page you will get a pop-up that you will have to define before the section will be added to the page. This is the same setup presented with the Page, only you now have the option to for making the section Repeatable.

To add a question to a section you will have to select the question type in the side navigation and drag the it to the section where you would like it to be displayed.

Upon dropping the question type in the section a pop-up will appear for you to create the actual question. In this pop-up you will define the question being asked and depending on the type the choices that the respondent can answer. In the example below we are asking a drop down question. When the client is asked, “Who was your Customer Service Representative?” they will be able to select one response from the four options listed (Anna, Brian, Carol, or Donald).

Any Page, Section, or Question that you create can be marked as a template. After you mark it as a template it is available for use on any Survey in your solution.
Note: Templates will not show up in the templates section until you re-load the designer page.
If you choose to use a Page Template please note that all sections and questions on the orignial page that was marked as a template, will show-up in the new page. This is true even if the sections and questions within the “Template Page,” are not marked as templates themselves. If the sections and questions within a page are marked as templates it means that they are also available to be used individually in other areas of the survey.
When a template is used, it is a copy of the original element (page, section, or question ) as it is at the time the template is selected to be used, not when the user checks the template field. Changes made to either the original element or the copied element, will not be reflected in the other related element.
Pages, sections, and questions made from Templates DO NOT contain any of the expressions or Tag Names that the original element had setup. It is not possible to ensure that the tags referenced by those expressions are present in the survey that the template was used in or that any tag values associated with the template questions will be unique.
To add a template to your survey, select an element (page, section, or question) from the Templates area and drag it onto your survey.

Once you drop the element a pop-up will appear (related to the element you initially selected) asking you to select with template you would like to use. Simply select the template you would like to use and click Save. This will prompt the solution to add the template to your survey.

Expressions are key to the Show/hide functionality in PowerSurveyPlus. A page, section or question may have expressions associated to it. An expression references a previous question on the survey by the “Question TagName.” It can only reference tags that appear before it on the survey.
An example of using expressions to make other sections on a survey visible or hidden, based on an answer could be:
The survey question is “Which PowerPacks are you currently subscribed to?” This is a multiple checkbox question and depending on which PowerPack options are selected, we have setup expression to make corresponding sections available to the respondent.
Here is the original question, which we have given the tag name “PowerPacks.”

On a new page of my survey I have created sections for each of the PowerPacks listed in my question, “Which PowerPacks are you currently subscribed to?”

In the setup of each of these sections under the Expression Tab, I have added a question tag. In the screen shot below we are looking at the Section Settings for PowerAttachment. In the expression I am saying if the
Question Tag “PowerPacks” = “PowerAttachment” (so the respondent has checked the PowerAttachment checkbox) make this section visible.

Note: It is important to use smart tag names so you know which questions they refer to.
If the expression evaluates as false the item will remain in its default state:

If a page is hidden all of its sections and their questions will be hidden; regardless of how any expressions on those items might evaluate to visible, that same is true for sections. Any expressions that refers to tags on hidden questions are not evaluated and have no effect – the question will remain in whatever it’s default state was – hidden or visible.
Tags cannot be placed on Matrix or Multiline text questions, so expressions cannot reference those types of questions to show or hide other items on the survey.
If you have multiple Expressions on an item they must all implement either AND or OR logic, Either all are true to evaluate the Expression as true or any are true to evaluate as true. You cannot mix “and/or” expressions.
The PowerSurveyPlus template editor includes twelve pre-designed templates as well as the option to create your own custom template.

To create your own theme, select the custom option and then Edit.
You will now see a sample survey containing each of the survey elements. You can simply click on the element you want to edit and will be presented with a pop-up to edit the font, size, color, etc.

Once you have finished customizing the template, you can apply the changes to the current survey by selecting Save To Survey. If you wish to save the changes as a template to use on other surveys, select the Save New Theme.

To apply a saved custom theme to other surveys, select the theme name from the look-up field on the Survey Information section.

Slugs are tags that can be added to questions or sections that display information from CRM or answers to previous questions. Slug tags need to encased by *| |* in order to work properly.
Slugs can be populated with answers from previous questions, by placing the question’s Tag Name between the *| |*.


The survey would like this when being filled out...

You can use values from CRM to populate slugs in the survey by adding &{slugname}={value}, either manually or dynamically in a workflow. For example, if the survey has a slug for first name (*|firstname|*) then adding &firstname=Susan to then end of the survey URL would populate the slugs with the name Susan. The example below shows how a user would append the first name field value using a workflow.


PowerObjects has made PowerSurveyPlus as robust as possible to accommodate all possible scenarios for sending surveys. Typically surveys will either be sent to one individual at a time (manually or automated), sent to a group, or filled out over the phone. The options are all listed in this section.
Navigate to the record that the email/survey will be sent from. Once on the record create a new email activity. You will notice that the email activity form has not been drastically changed, but we have added a PowerSurveyPlus section at the bottom of the form. Simply fill out the email activity as normal and denote the survey you would like to send in the PowerSurveyPlus section. Within the body of the email you will want to enter the token |powersurvey| where you would like the link to appear. If you do not add the |powersurvey| token to the email the link will automatically render at the bottom of the email.

Once you send the email activity you will notice that the survey token will convert to a link.

Navigate to Survey Activities by clicking on the chevron next to the survey name in the top menu. Select Add New PO Survey Activity.

This will open a new window where you can define the details of the survey activity. Creating and sending a Survey Activity is the equivalent of sending an email except that when filling out a Survey Activity you will have to define the regarding field. Once you have filled in the regarding field and set the Send Link field to ‘Email’ the To Name and To Email field will appear populated.

From there you will simply have to build out the email, giving it a subject and content. If you want the survey link to render in a specific spot within the body of the email, you will have to enter the token |powersurvey|. Once the email is sent this token will be converted to a hyperlink. If you do not define a token within the body of the email, the link to the survey will render at the end of your email.

Once you save the Survey Activity, the email will be sent to the recipient defined. Additionally, the Survey Activity itself will automatically populate the Survey Sent and Survey URL fields and the |powersurvey| token will show as converted.

In order to send a survey to a number of people at once, you will have to create an email template. Navigate to the templates area of CRM and create a new Email Template. Within the email template content you will have to add a PowerSurvey token so the solution will pull the correct survey.

The token must be used in the following format:
powersurvey=|Exact Name of Survey|
Note: The spelling and case are important when typing in the exact name of survey. These tokens may not be inserted elsewhere in CRM (such as individual e-mail activities) as the activity is not associated with the Survey.
Navigate in CRM to Settings > Processes > New. Type the name of your workflow into the Process name field. Choose workflow from the Category dropdown. Select the desired Target Entity from the Entity dropdown and click OK.

Note: This example only shows the e-mail step and is not a complete workflow. The e-mail will be sent from a previously created E-mail template or from a brand new e-mail message.
Choose Use Template or Create New Message from the Send Email dropdown and click Set Properties.

If selecting Use Template simply choose the template you want to use and click Save and Close.
If Create New Message was selected set up the e-mail as preferred. Make sure the Link to Survey is populated with the correct survey. Then, anywhere in the body of the e-mail, insert the PowerSurvey token, |powersurvey|. If the token is not inserted into the e-mail, it will appear at the bottom. Click Save and Close.

Note: Make sure the “Regarding” field of the e-mail is set to an entity that has a survey mapping created for it. If the regarding is not set, the survey link will not be inserted.
Users can add the survey's MailChimp link to MailChimp templates so that completed surveys will be linked to the email recipient.
On the survey, select the Copy MailChimp Link under the ellipsis, and copy the URL from the pop-up window. Add this link in your MailChimp template to direct users to your survey.

Note: If the anonymous link is added to the template, you will receive survey submissions but they will not be tied to a record in CRM.
Another option for filling out a survey would be to open a contact or lead record and click on Fill out Survey. This way, it is possible to fill out the survey for that contact or lead on the spot, instead of having to e-mail them the survey. It is great for people who are conducting calls with contacts and leads.
Navigate to the record you would like to work with, select the ellipse from the ribbon and select Fill Out Survey.

This will open a look-up where you can select which Survey you would like to fill out for the record. Once you select the survey and select add, the solution will automatically pull up the survey for you to fill out.
With PowerSurveyPlus, users have the ability to send out anonymous surveys whether it is through an email or being posted on a website.
Open the survey you want to use, select the Copy Anonymous Link from the ellipses, and copy the URL in the pop-up box.

Every time someone clicks on the link, an anonymous survey activity will be created. These anonymous survey activities can be viewed under the Survey Activities of the survey itself.
Survey responses can be emailed directly or found in a few different places in CRM.
Navigate to PowerPack > Surveys > Select the Survey you want to work with and from the ribbon choose Survey Activities.
This view will list out all of the survey activities that have been recorded, that are associated with the Survey record you are on.

If you double click on a Survey Activity, the main form will show you the details of the Activity including the email the survey was sent in, Survey Sent information, and the Survey Completed information. To access the actual responses recorded users will have to navigate to the Survey Responses Section from the navigation.

Under the Survey Responses area the view will show the questions asked, the response given, and the time and date the response was submitted.

Once a survey has been sent via email, a survey activity will be created and set regarding to the email's regarding record. If you send the survey through a workflow email, you can set the survey regarding a different record than the email's regarding.
The survey activity can be found in the Activity View of the regarding record.

Open the survey activity to view the survey responses, if the recipient has not completed the survey no results will be displayed.

Each survey contains a generic report that displays each survey questions response in graphical form. The type of graph displayed will depend on the type of question asked.
To run the report, under the ellipses select the Run Report and then select the PowerSurveyPlus Report.

The report provided is a basic overview report, users are able to create their own reports within CRM. If you'd like PowerObjects to create a report through a billable support case please contact our support team.


Note: The report may take a little bit of time to load.
This process is designed to redeploy a survey to a new PowerPack cloud (for example, let’s say you built the surveys initially in the Central US cloud, and now you’d like to use the West Europe cloud), or if an environment is copied from one instance into another (if you’ve copied dev into prod, for example).
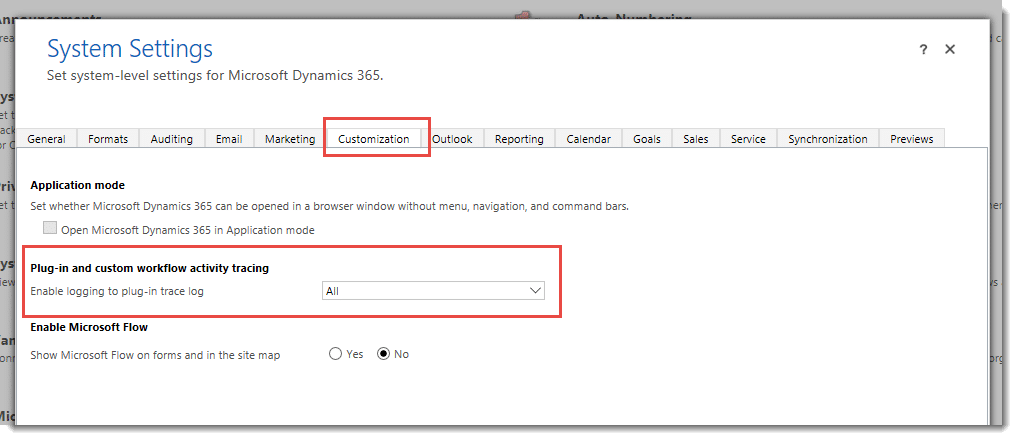
IMPORTANT: Remember to come back here and turn OFF plugin tracing when you’re finished, so records don’t accumulate unnecessarily in your system.
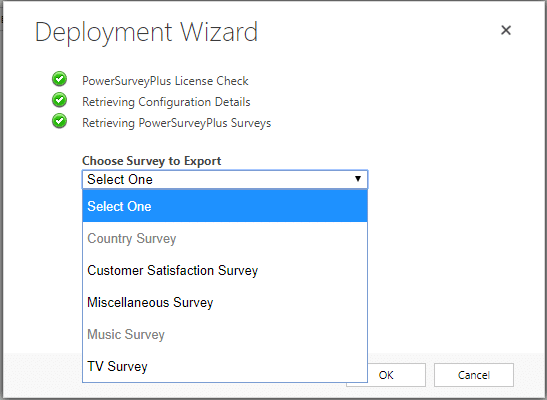
The Deployment Wizard dialog box will open. Select one survey and click on OK button.

After each survey is successfully migrated that survey will be disabled in the dropdown list as shown in picture below.
Note: This process will need to be repeated for each survey you’d like to redeploy.
Once every survey has been migrated successfully the Cancel button will be changed into a Done button surrounded by green line. At this point it will be clear that all surveys have been successfully migrated. If there are any errors, please check the plugin trace log.
To uninstall PowerSurveyPlus, navigate to the solutions area and delete the PowerSurveyPlus solution.
Deleting the solution will remove all records and activities associated with PowerSurveyPlus, including any PowerSurveyPlus activities. If you would like to keep this information in your system, you can simply unsubscribe and leave the solution in your system.
Thank you for your interest in PowerSurveyPlus, should you choose to subscribe you will be charged $2/enabled CRM user/month. If you have any questions or run into any issues with PowerSurveyPlus, our friendly support team is here to help!

