Welcome back to our four-part blog series on Field Types. In Part I, we tackled Rollup Fields – if you missed it, check it out here. In today's blog, we'll take it a step further and discuss Calculated Fields, including when and why to use them and how to add them. Let's get started.
Recalling back to Part I, we wanted to easily see the number of tasks against each opportunity as well as how many of those tasks have been completed at any given time. To accomplish this, we created two roll-up fields: Tasks and Tasks Completed.
The result was a view that looked like this:
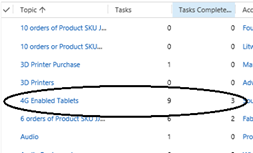
It allowed us to see that the 4G Enabled Tablets opportunity required 9 tasks, but only 3 of those had been completed. This is useful information but it would be nice to take it a step further.
Let's say that for each opportunity or Topic we want to quickly see the percentage of tasks completed and the number of tasks outstanding. Luckily, it's just a matter of creating a couple new fields.
First, let's define the math required to achieve our desired information:
% Completed = (Tasks Completed /Tasks) * 100
Tasks Outstanding = Tasks – Tasks Completed
Note that both formulas require that we know Tasks Completed and Tasks. You'll see these exact two fields in PART I of this series!
1. Begin by creating the first of two more new Fields. In our example below, we've named it % Completed. Set Data Type to Decimal Number; set Field Type to Calculated as shown:
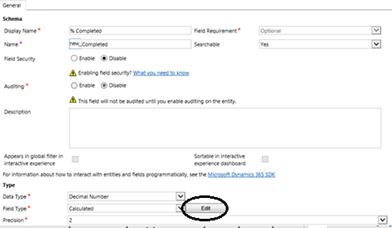
Note in the screenshot above that the Schema automatically removes the % from the 'Name' but don't worry, because the Display Name (which is what we will eventually see in our View) retains the %.
2. Click Edit (circled above) to modify the properties of the Calculated field.
3. You may recall that in Part I of this blog series when we created two new fields: Tasks and Tasks Completed, we made a special note of the fact that we were including the word Tasks in the name of each new field. Well, here is where that comes in handy. On the next screen, click in the action area to the right of the equal sign and start typing Tasks. As you begin typing, all field names that match the text you've entered will appear, as shown below. How cool is that?

4. At this point, we want to define the actual calculation we want performed in the % Completed field. Earlier, we defined this as % Completed = (Tasks Completed/Tasks) * 100. So, double-click on new_taskscompleted from the available options, and this will add the field name to the action area. Next, type "/" then double-click on new_tasks to add it to the action area. Type *100. Finally, add the necessary brackets. When you're done, it will look like this:
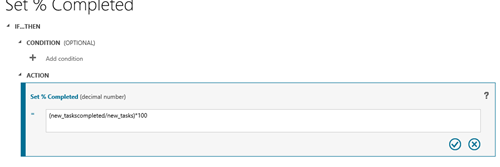
Note that adding a CONDITION is optional. You'll see that in our example neither is needed since we want to apply the calculation to every Opportunity record without exclusion.
5. In step five we'll create the second of two new Fields, we've named it Tasks Outstanding. Set Data Type to Whole Number; set Field Type to Calculated, as shown:
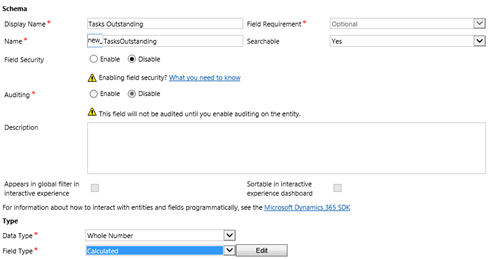
6. Click Edit to modify the properties of the Calculated field. Once again, begin typing Tasks in the action area to reveal the available fields.
At this point, we want to define the actual calculation we want to be performed in the Tasks Outstanding field. Earlier, we defined this as Tasks Outstanding = Tasks – Tasks Completed. Double-click on new_tasks from the available options this will add the field name to the action area. Next, type "-" then double-click on new_taskscompleted to add it to the action area. It should look like this:

Once again, note that adding a CONDITION is optional. In our example, neither is needed since we want to apply the calculation to every Opportunity record without exclusion.
7. In step seven, we need to add our two newly-created fields to our existing Section in the Form. For more information, see Customizing Entities.
8. After that, we need to add our new fields to a View, which is as simple as selecting the View and adding the columns. For detailed information on how to do this, please see Customizing Views.
9. Publish all changes. Unlike Rollup fields, which take up to 24 hours for the changes to be applied, Calculated fields are updated immediately. This means all your data is populated right away, as shown below:
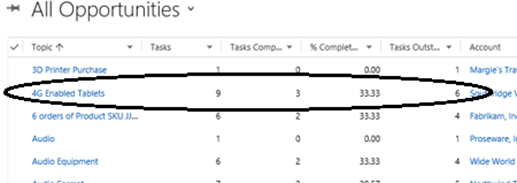
Now we can very quickly and easily see that the 4G Enabled Tablets opportunity, for example, is 33.33% complete with 6 outstanding tasks. All the math is done for us! Pretty slick!
Well, that'll do it for Part II. In our next blog on Field Types, we will tackle Option Sets. Wait until you see what's in store!
In the meantime, Happy Dynamics 365'ing!
 How Microsoft Power Platform is helping to modernize and enable...
 Deliver an Extraordinary Omnichannel Experience
 Data Interoperability Key to Improving the Patient Experience


