
How Microsoft Power Platform is helping to modernize and enable...
In this webinar, our experts showcase a variety of demo use cases of how different components of the...
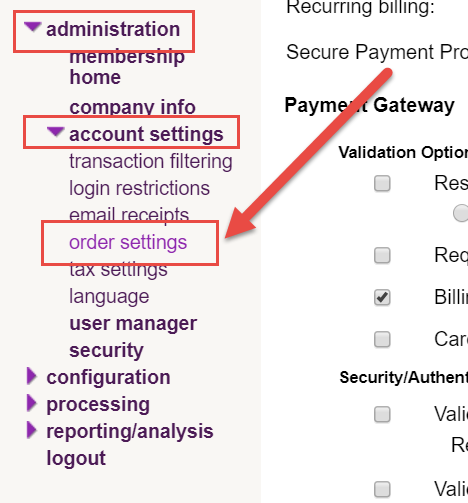
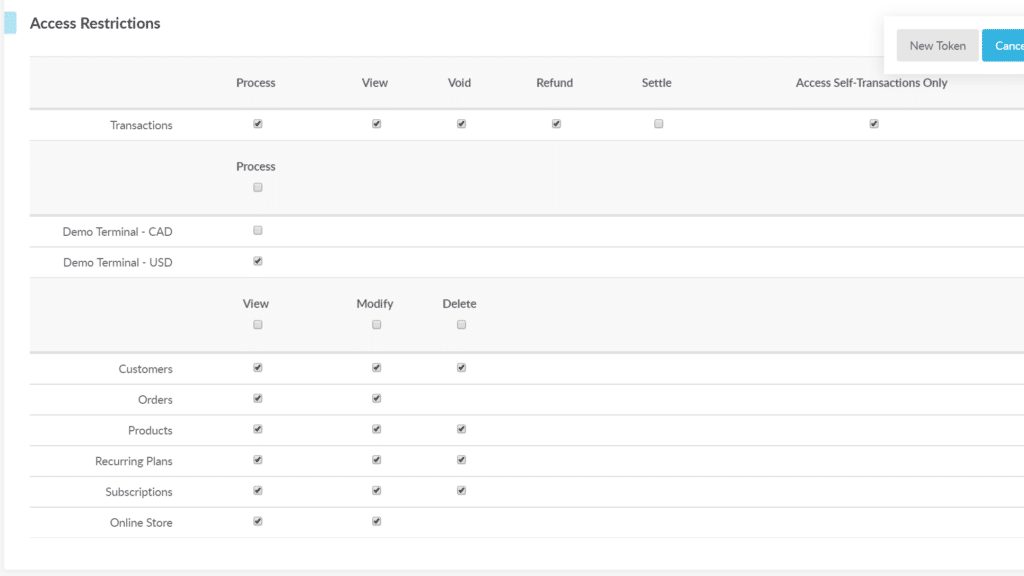
Every user who would like to have access to use PowerCharge will need the PowerCharge User assigned to them. For users who would like to have the ability to create transactions on behalf of other users need the PowerCharge Administrator security role. System Administrators will automatically see PowerCharge in their left navigation and be able to use PowerCharge, even without having the security role assigned.

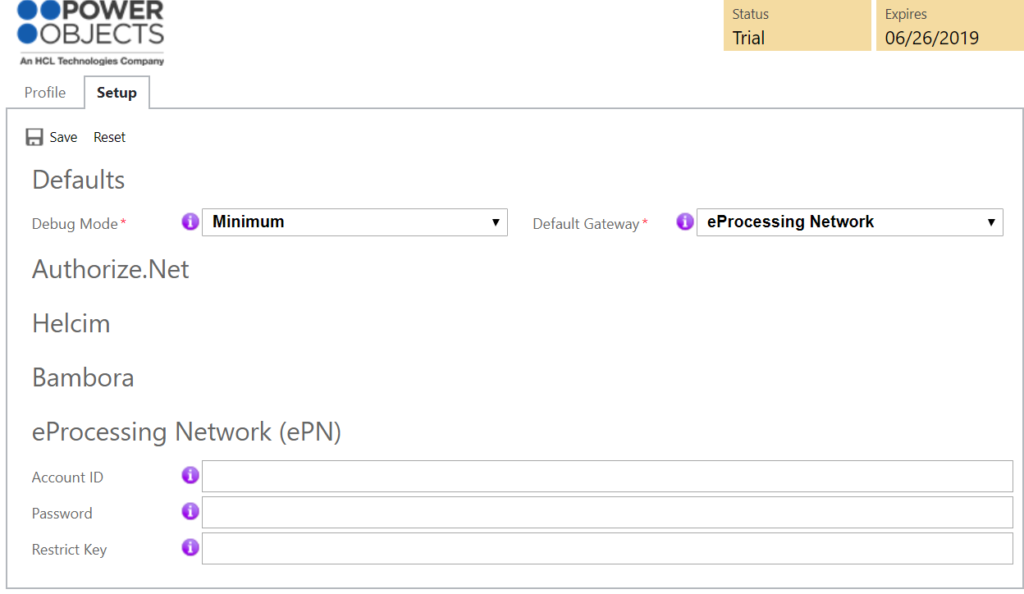
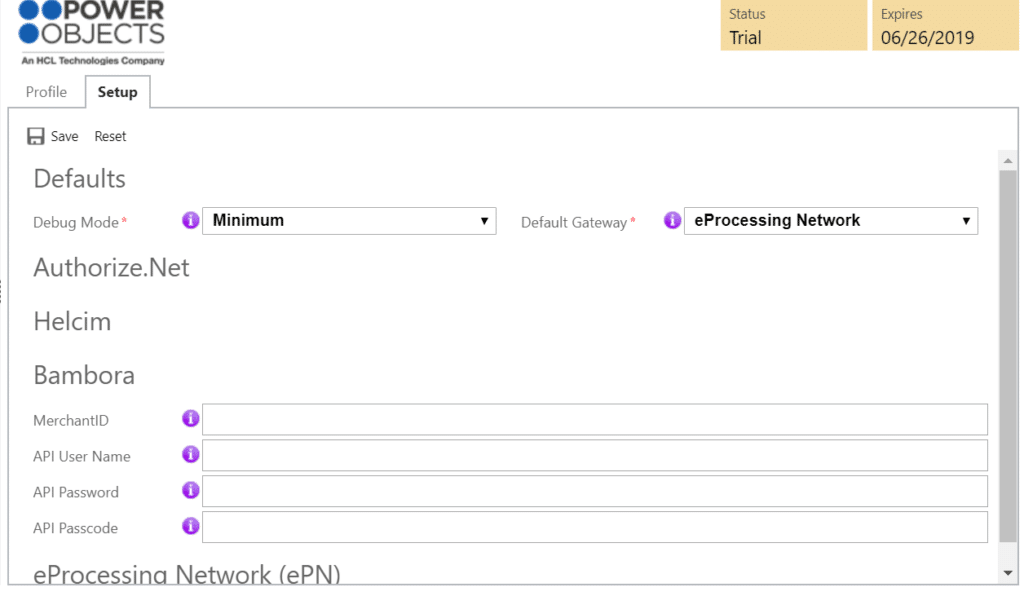
Once you have imported and registered the PowerCharge solution for your Microsoft Dynamics CRM system it will need to be configured. To configure PowerCharge navigate to the setup tab. Once you’ve clicked on the Setup Tab, you can choose a debug mode. By default, the “Minimum” debug mode will be turned on. This will include logs for important events, such as errors in the PowerCharge log. The Advanced debug mode will create additional debug records which may be useful in debugging. However, the Advanced method of debugging may take up more disk space and is not recommended. Next, choose your default gateway. This is the gateway that will be used, by default when you store new credit card records.

After you determine your defaults, click on the name of the gateway you would like to use. Enter the required information and Save. The required information can be found by logging into your payment gateway.
For more information on how you to set up your payment gateway, see the Gateway Configuration section below.
Note: You will need a merchant account with authorize.net, BeanStream or eProcessing Network in order for PowerCharge to work in your CRM system. If you do not already have one of these merchant accounts, please contact:
Nikki NortonThis document will outline the steps in configuring the processing gateways that can be used with PowerObjects’ PowerCharge add-on.
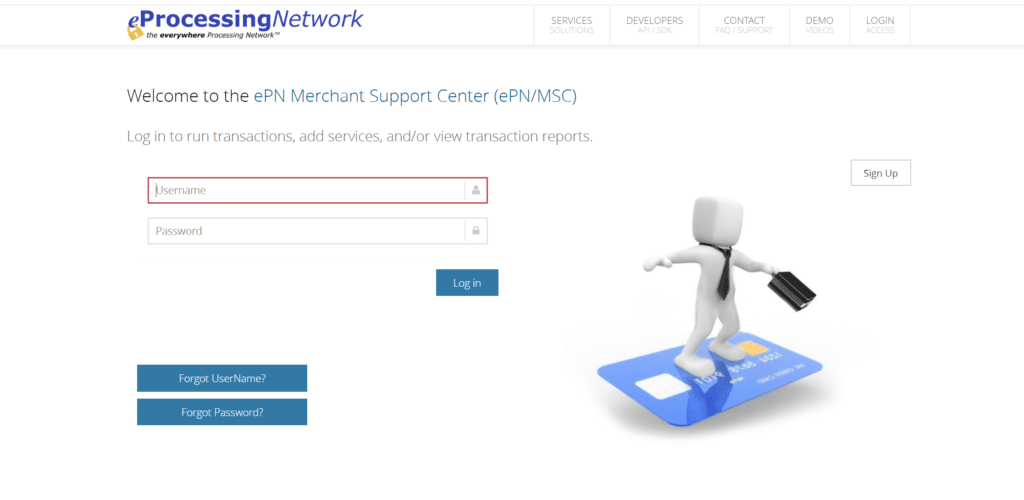
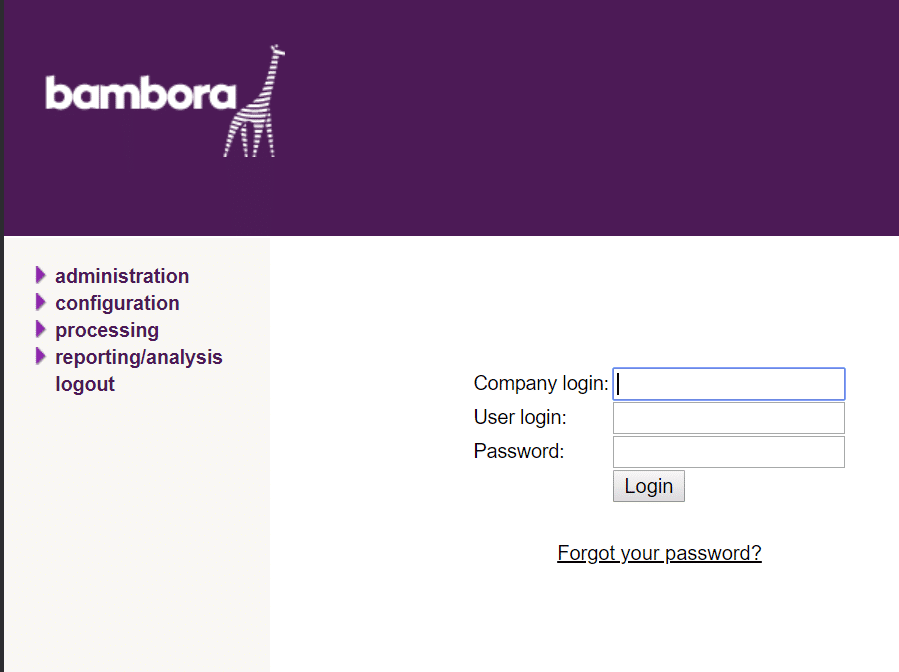
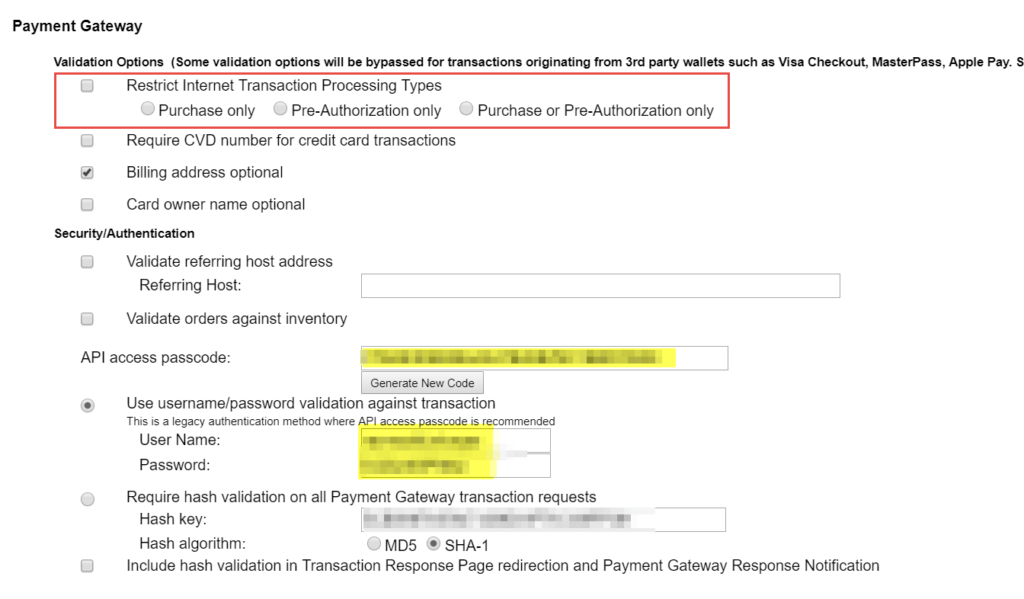
To configure eProcessing Network (ePN) in PowerCharge you will need an Account ID, Password, and Restrict Key. The Account ID and Password will be equivalent to the Username and Password you use to log in to ePN Merchant Support Center below.


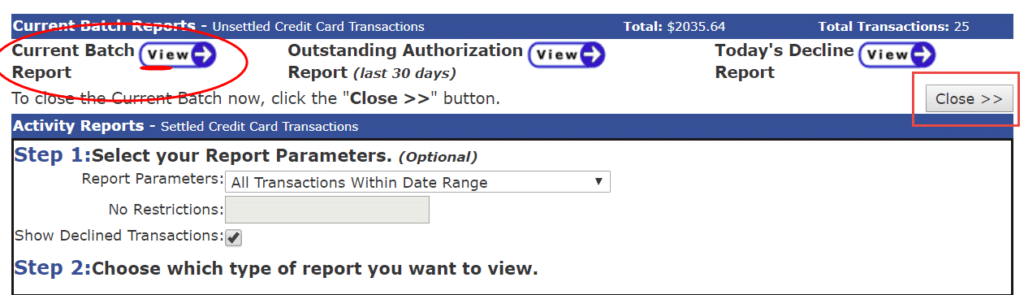
Please note that ePN uses batching with its transactions. Refunds may not go through on an order while a transaction is processing. To view your Current Batch Report, go to the ePN Merchant Support Center and click on “Activity Reports” in the side menu. Then click on “Current Batch Report”. This will list all the transaction that have not been closed and are prepared in a ‘batch’ which will process each day at a standard time. If you wish to process and close these transactions immediately click on the “Close>>” button.
To configure Bambora in PowerCharge you will need a Merchant ID, API Username, API Password, and API Passcode.

If you have any trouble finding this information, please contact your merchant account representative.
Verify that the Customer Information Manager (CIM) has been enabled on your Authorize.Net account. Failure to activate CIM will result in the following error message when attempting to tokenize credit cards with PowerCharge:
“E00044 Customer Information Manager in not enabled”
A full list of error codes and requirements can be found in the documentation publicly available on Authorize.net’s CIM webpage: http://developer.authorize.net/api/cim/
To configure Authorize.Net in PowerCharge you will need an API Login, and Transaction Key. To process real credit cards (instead of test cards), set Mode to “Live”.

Note: Sandbox and Live modes use different authentication credentials. Failure to use the correct API Login and Transaction Key with the appropriate Authorize.net mode will result in error code: E00007 when attempting to save a credit card in PowerCharge.
Other Notable Features with Authorize.Net:
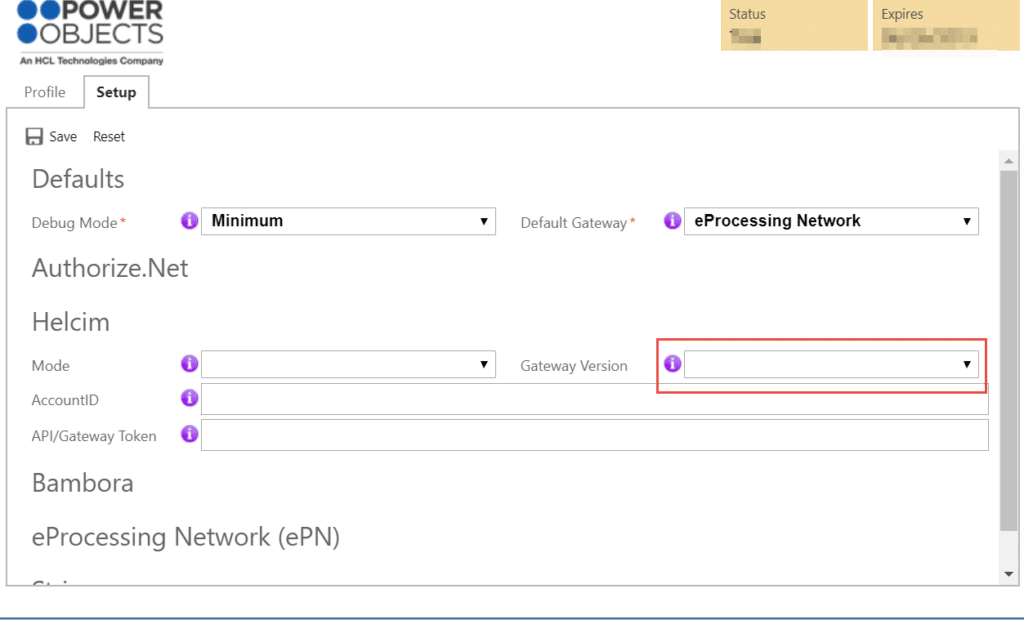
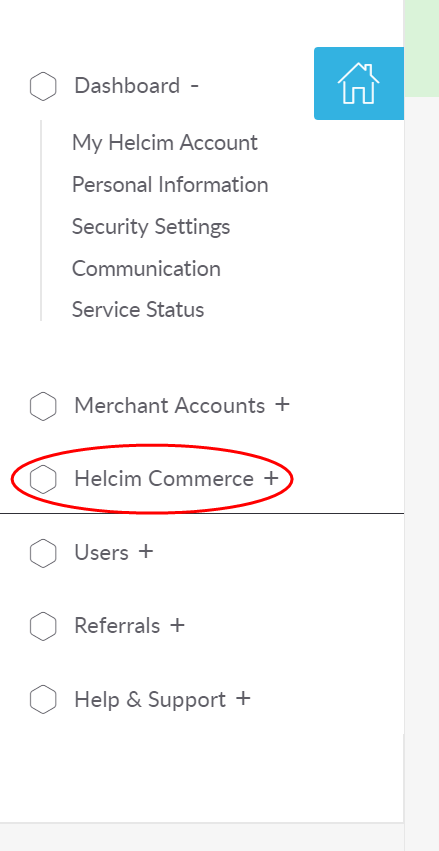
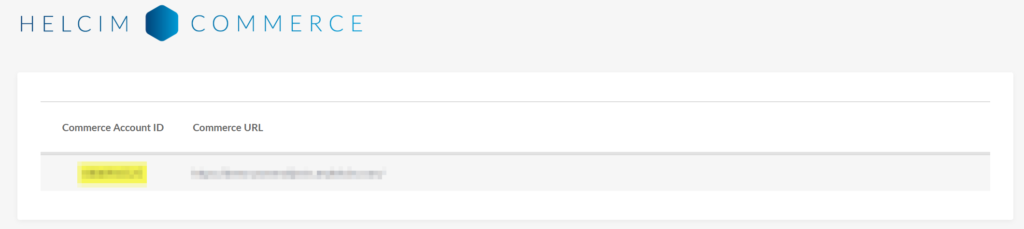
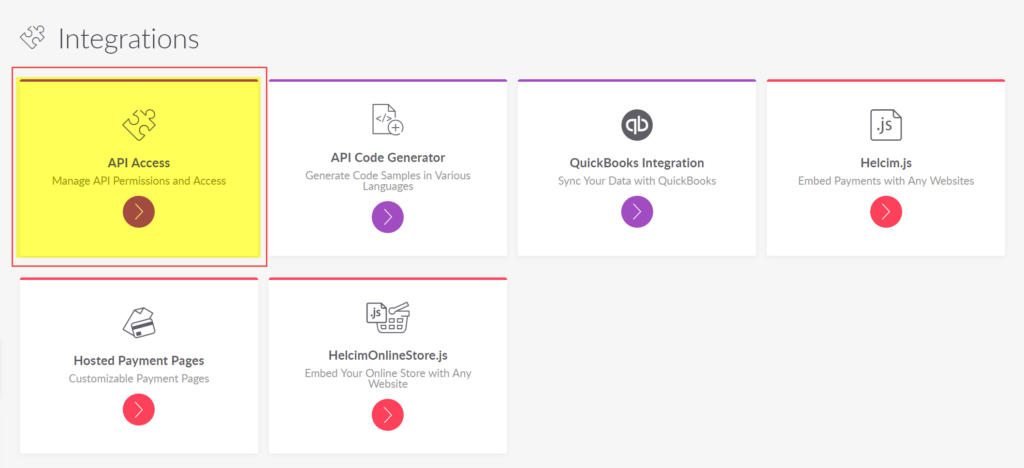
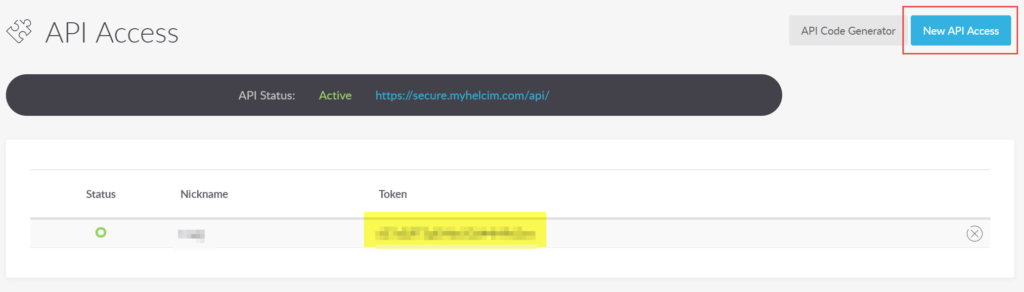
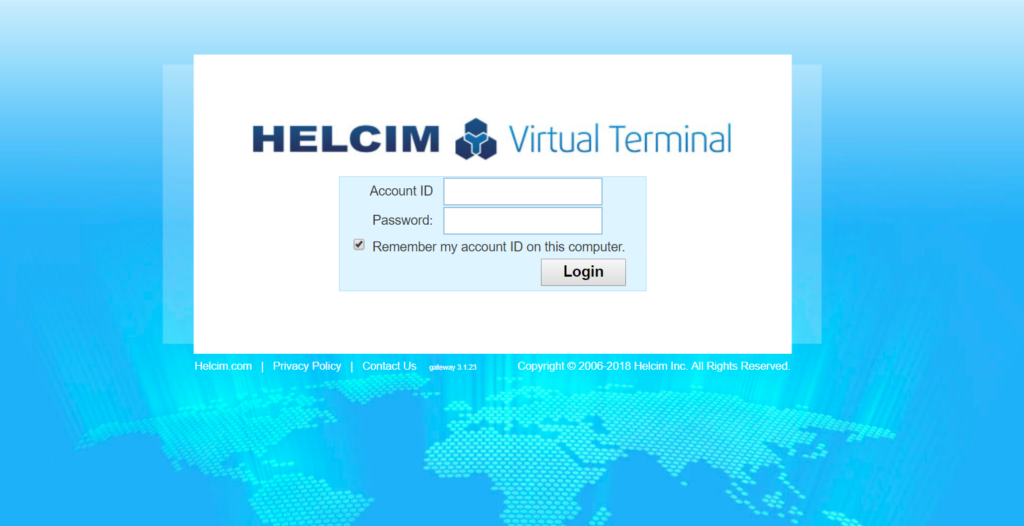
To configure Helcim in PowerCharge you will need an Account ID, and API Token. To process real credit cards (instead of test cards), set Mode to “Live”.
Helcim has two portals you can use, Helcim Virtual Terminal and Helcim Commerce. You can choose which version you would like to use, by selecting one from the Gateway Version selector in the configuration screen.

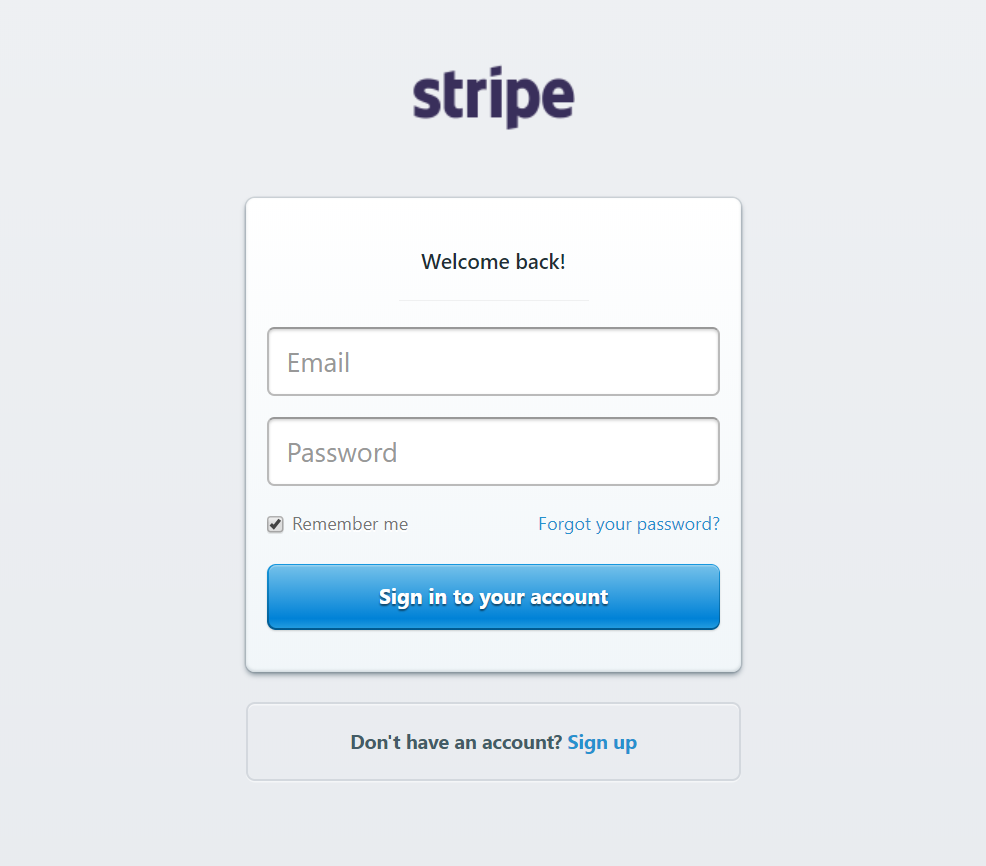
To configure Stripe you will need a Secret Key.

---------------------------------------
Once these values have been successfully saved in the configuration screen, PowerCharge is ready to begin tokenizing credit cards.
European Stripe users
Starting September 14, 2019, banks in Europe will start using a 3D Secure system. This extra security will be applied to some credit card charges. You may find that occasionally a charge will need to undergo an authentication process where the card-holder must agree to a charge before it can be processed.
If using the Stripe gateway, PowerCharge will recognize that this process is taking place, and put the affected transaction into a Pending state. Charges in a Pending state have not yet completed or failed and are waiting on a response from the card-holder.
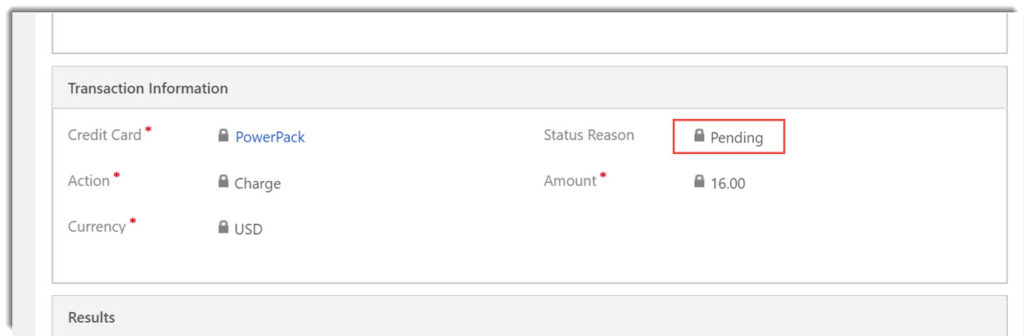
Credit Card Transactions which are Pending and awaiting authentication will appear in the Pending Transactions view.

To determine whether these charges have been authenticated, a workflow and action have been included that will get the most recent results from Stripe. To run this workflow, select Run Workflow from the Ribbon (it may be under the ellipsis menu), and select Run Workflow.
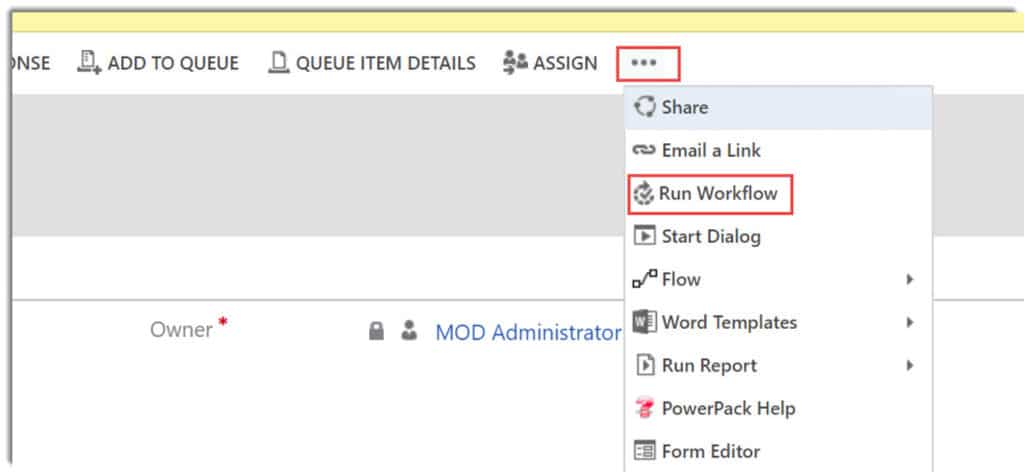
Then select the workflow called Check Transaction is Authenticated, and click Add. This will run the PowerCharge Check Authentication Action on the selected Transaction record, and determine if the charge is successful, failed, or still pending.
*Included is an on-demand workflow that will use an action to check pending charges from a view, or form. This action can be configured as needed by the PowerCharge user. If you need assistance, our billable team can help you set up a timed or scheduled workflow that uses this Action in a way that suits your needs.
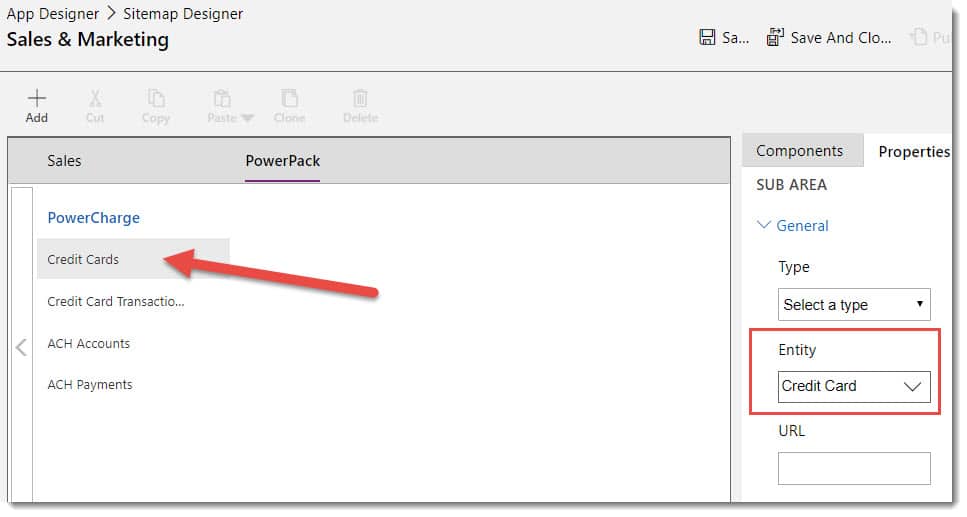
Once you’ve imported PowerCharge navigate to the PowerPack section of your CRM and you will see PowerCharge there. To enter a new credit card select Credit Card from the navigation and click on New.

Fill in the credit card information and the billing information on the form. Then choose a Payment Gateway to store the card with. The default gateway will automatically be set based on the default that you have configured in your PowerCharge setup. If you’d like to change your default gateway, you can do so in the PowerCharge setup area, within the PowerCharge configuration. If you would like to relate this credit card to a contact or account, choose a contact or account in the lookups at the top of the credit card record.
If using the Stripe payment gateway, you will be prompted to choose a default currency to charge for the card. This will allow you to choose from more than 135 international currencies.
Warning: Do not remove fields from the credit card or credit card transaction records. These fields are necessary for the plugins related to PowerCharge to function as they should and may also be required by the payment gateway itself. You may add fields to the credit card forms if you would like, but do not remove fields from the form.
Click on Save. You will know the credit card has been successfully saved with your gateway, because an encryption token and a credit card status will be passed back to you with a “SUCCESSFUL” message of some sort. If the card was not saved successfully, you will see “FAILED” and it will tell you why the card has not been saved successfully. As soon as the card is saved with the gateway, the card number will display only the last 4 digits, and the CCV will be wiped.

Note: If your credit card status asks you to check the PowerCharge log, do an advanced find for PowerCharge Log add all columns to the search and click Results.
To update a credit card record you must re-enter the entire credit card number, expiration date, and CCV before the information can be re-submitted to the payment gateway. If all of the information is not updated, the update will be isolated to CRM, which will be noted in the Credit Card Status on the record. This provides security as well as a means to make simple changes to the form such as a telephone number or parent contact without passing the information to the gateway.
There are multiple ways to go about charging the credit card. You can charge a card manually either from the credit card record or from the account or contact record, or you can charge the card automatically through a workflow.
Navigate to the credit card record you wish to charge and open the record. Click on the “more options” icon, select ‘Other Activities’ and then select ’Credit Card Transaction’.
![]()
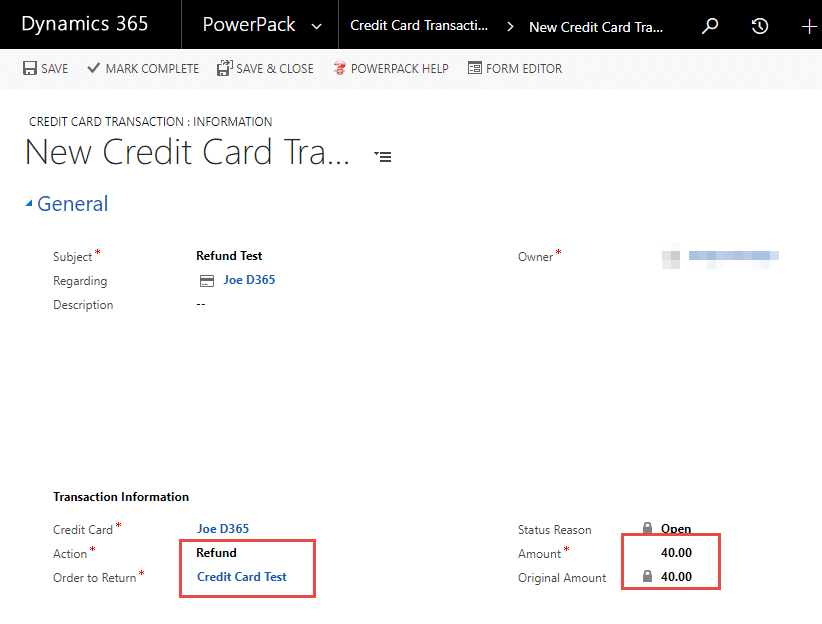
Fill in the Subject line, set the regarding, select a credit card to charge (if it isn’t already listed there), select whether you want to Charge or Refund the card, enter an amount and click on Save or Mark complete. This will run the transaction (be patent while the transaction runs).
![]()
![]()
Note: If using the Stripe payment gateway, the transaction will default to the same currency as the currency on the related credit card. The currency can be changed, if desired.
If you need to refund the card, you will need to select an order to refund, and the amount of the refund cannot exceed the amount of the charge. You will know the transaction was successful because a Transaction Result with a message of “APPROVED” and a Transaction ID will get populated back into the activity record.
Note: If using the Stripe payment gateway, refunds will always use the same currency in which the original transaction was charged.
Navigate to and open a contact or an account record. Select the ellipses, then Other Activities and Credit Card Transaction.
![]()
Fill in the Subject line, set the regarding, select a credit card to charge (if it isn’t already listed there), select whether you want to Charge or Refund the card, enter an amount and click on Save or Mark complete. This will run the transaction (be patient while the transaction is running). If you need to refund the card, you will need to select an order to refund, and the amount of the refund cannot exceed the amount of the charge. You will know the transaction was successful because a Transaction Result with a message of “APPROVED” and a Transaction ID will get populated back into the activity record.
If you are trying to process a monthly subscription or a charge that occurs on a regular basis, you could charge credit cards with a workflow. How you set up the workflow will vary depending on what you are trying to do and can be more complicated depending on your process; please contact your CRM administrator to help you build this workflow.
The credit card transaction will show up under the credit card that was charged, and will also show in the list of closed activities on the record the transaction was set regarding (in the above example, if we go to closed activities on the Joe CRM contact record, we will see the credit card transaction listed there).
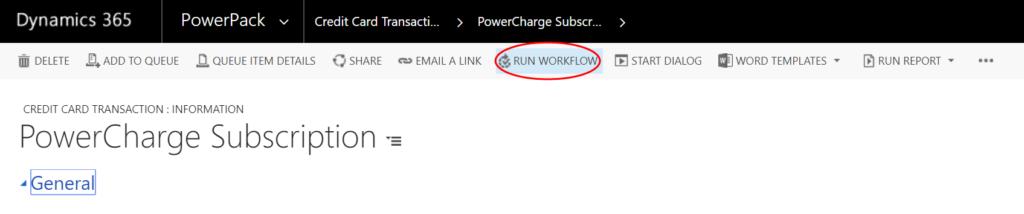
When you import PowerCharge, a workflow (deactivated) is automatically imported into your CRM. This workflow allows users to re-run a credit card transaction on demand. To use this workflow, you will first need to activate it. To run the workflow, open the credit card transaction record you’d like to re-run, click on Run Workflow and choose the “Re-run Credit Card Transaction” workflow.

This will rerun the transaction the workflow was initiated from.
On the credit card transaction screen, you will notice a check box called “Historical Import” if you expand the Maintenance section.

If you want to import historical transaction records, you can use the general import feature of CRM. Remember, if you want to import transactions related to credit cards, you need to import the credit cards first, and then import the transactions related to them. When you’re importing transactions, remember to put the value for this checkbox to “true”/checked in your spreadsheet so that the transactions do not actually get run. If the “Historical Transactions” check box is not checked, the transactions will be run as they normally would and the related card will get charged.
Note: These payments are only available using the Authorize.net payment gateway.
The ability to process ACH payments allows users to tokenize Savings, Checking, or Business Checking account information with Authorize.Net’s Customer Information Management (CIM) interface for use with future transactions in a safe and secure way.
Documentation on Authorize.Net’s Customer Information Manager and eCheck.Net services can be found in Authorize.Net’s developer center on the Authorize.Net web site. It is highly recommended that PowerCharge users review these documents before engaging in any business activity.
Tokenizing a bank account with Authorize.Net’s CIM interface is quick and easy.
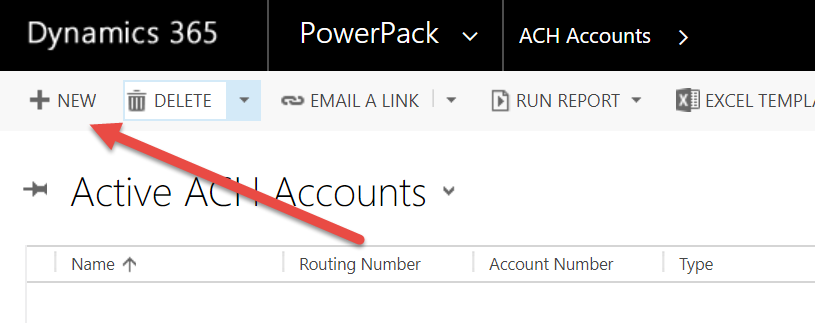
First, open Dynamics CRM and Access the PowerPack tab to bring up the PowerCharge-related entities. Select the ACH Accounts entity, and click on New to bring up a new ACH Account form.
Enter the required fields on the ACH Account form and click the Save.
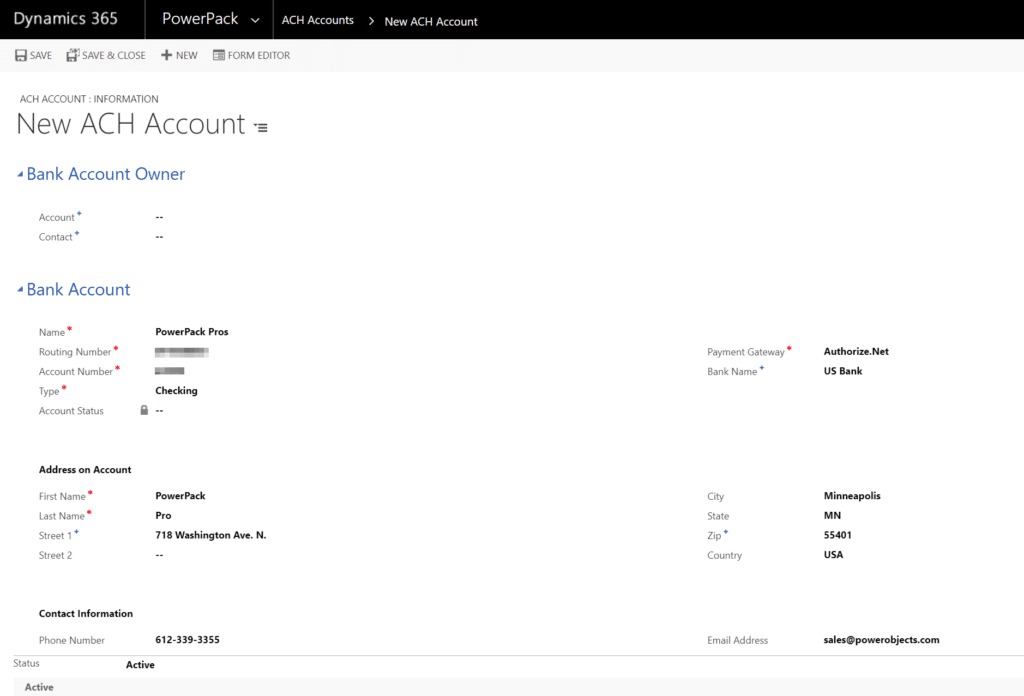

Changes made to the ACH Account record in CRM will only be passed to Authorize.Net’s CIM interface if both the client’s routing number and account number are entered on the form at the time the record is updated. This provides security as well as a means to make simple changes to the form such as a telephone number or parent contact without passing the information to the gateway. The credit card status will reflect whether the update has been isolated in CRM or not.
Should the need arise to delete an ACH Account record, simply press the Delete button for the record on the CRM Ribbon.
Note: Deleting an ACH Account record in CRM will also delete the associated customer profile in Authorize.Net’s CIM interface. Any ACH Transaction records in CRM will remain in CRM for record keeping purposes, but associated records may not be available for viewing in Authorize.Net’s CIM interface.
Transactions can be processed against an ACH Account by accessing the ACH Transaction form in CRM. This form can be opened through various CRM Activities menus or through the ACH Account form.
To create an ACH Transaction, navigate the ACH Account you would like to charge, and click on ACH transactions in the menu.
Click on Add New ACHTransaction to create a new charge or refund.
![]()
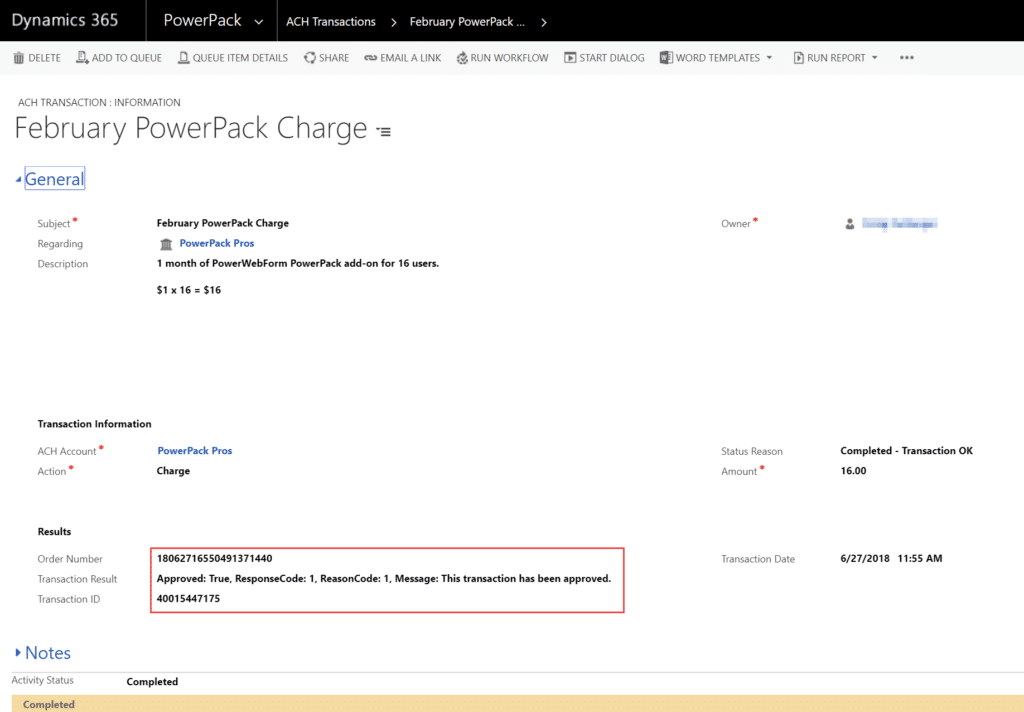
Specify a subject for the transaction, choose a record to set the transaction regarding, and input a description for the transaction. Then choose whether you are charging or refunding, and specify an amount. Then Save or Mark Complete to run that transaction.
![]()
Wait for PowerCharge to communicate with the gateway. When a response returns from the payment gateway the results of the transaction will be displayed on the form, telling you whether the transaction succeeded or failed, and if it failed, why it failed.
Processing a refund is would follow the exact same process as processing a charge. To process a refund, open a new ACH Transaction record and change the Action field from “Charge” to “Refund”. Then select a previously settled transaction in the Order to Return lookup field. Enter an amount, and save.

Please be aware that it is unlikely that the payment gateway will allow a cumulative refund amount greater than the amount of the original purchase.
When a response returns from the payment gateway, the results of the transaction will be displayed on the form in the same manner as ACH Transaction charges.
Approved: False, ResponseCode: 3, Message: The referenced transaction does not meet the criteria for issuing a credit.

Example of a Refund attempt in ‘Test’ mode:
Approved: False, ResponseCode: 3, Message: The transaction cannot be found.
If any of your error messages are referencing the PowerCharge Log, you can do an advanced find for this log. Look for the PowerCharge log and click on Results. This log will outline, more specifically, what the error you’ve encountered is. Remember to add the columns you’d like to see in the log, before you click Results.

To uninstall, first delete any credit card records you created have. Then uninstall as usual, by deleting the solution.
Deleting the solution will remove the existing information and activities that have been created (so it will remove existing credit card and credit card transaction records) from CRM, but the information will still exist in the payment gateway
Uninstalling the solution does not unsubscribe the solution. If you're discontinuing use of the add-on, you must first unsubscribe in the solution.
PowerEmail is compatible with the Dynamics 365 online UCI. Make sure you have the UCI compatible version downloaded from our website and installed in your CRM.
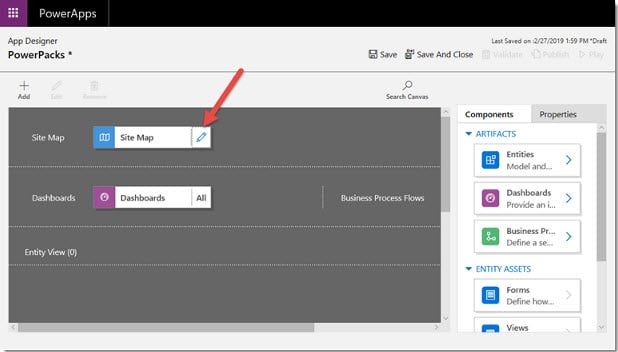
Once you have PowerEmail installed you can to add it to your sitemap, along with the entities and web resources the solution provides by editing an app and adding the components in your app designer.
Thank you for your interest in PowerCharge, should you choose to subscribe you will be charged $1/enabled CRM user/month. If you have any questions or run into any issues with PowerCharge, our friendly support team is here to help!

