Looking for PowerObjects? Don’t worry, you’re in the right place! We’ve been part of HCL for several years, and we’ve now taken the final step in our acquisition journey: moving our website to the HCL domain. Nothing else is changing – we are still fanatically focused on Microsoft Business Applications!

PowerObjects Blog 

for Microsoft Business Applications


How to Create a URL from a Text Field Using JavaScript in Dynamics CRM

Post Author: Joe D365 |

Suppose you wanted to automatically email a URL based on a field in CRM. For example, if an account name is XYZaccount, then suppose you want to email a url that is http://www.XYZaccount.mydomain.com.

Attempting to directly use the field name in a URL in a workflow that sends an email won't work. What we've done in a situation that required this was to simply write a simple JavaScript function that builds that URL into a new field we created, and then use that new field in our workflow.

Here are the steps to do this.

  1. Go to the form editor for the entity that this will work on. In this example we'll use the account entity.


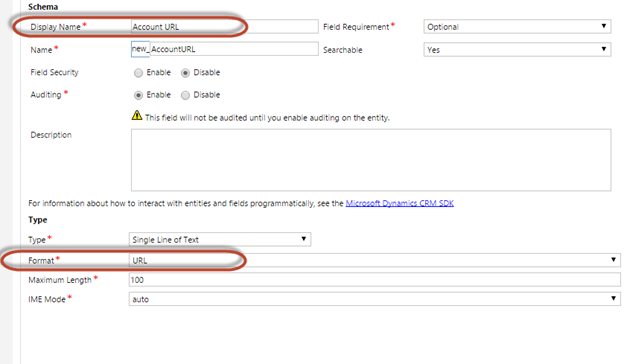
  2. First, we'll create the new field to store the URL that we will create. In the form editor for the account entity, click on "new field". Give it a meaningful name, and set the format to url. Save and close, then publish.


    Text Field Using JavaScript

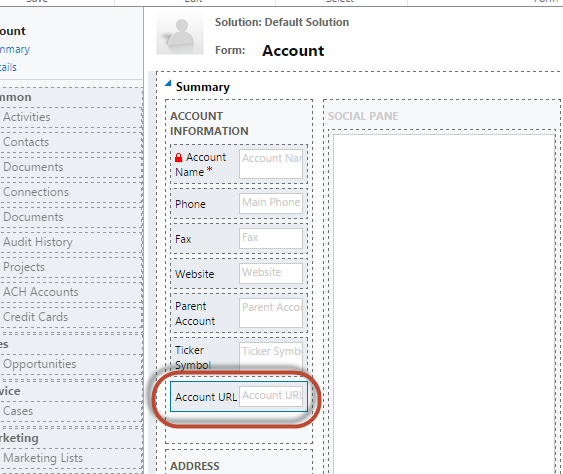
  3. Press F5 to refresh your browser, after which you should see your new field in the column on the right. Drag it out to somewhere on the form that you want it to display (you can remove later if you want, after creating the workflow).


    Text Field Using JavaScript


  4. Now that the new field is on the account form, Save, and then publish again.


  5. Now we can write the javascript function that will populate this new field based on what's in the account name field. In the top ribbon of the form editor, press "Form properties".


    Text Field Using JavaScript


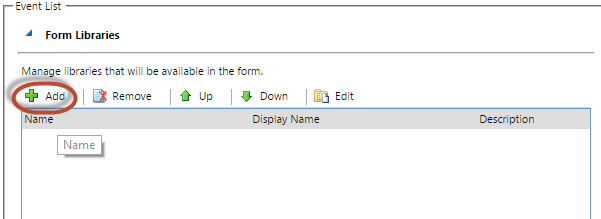
  6. In the Form Libraries section, click add.


    Text Field Using JavaScript


  7. Click new to create a new web resource.


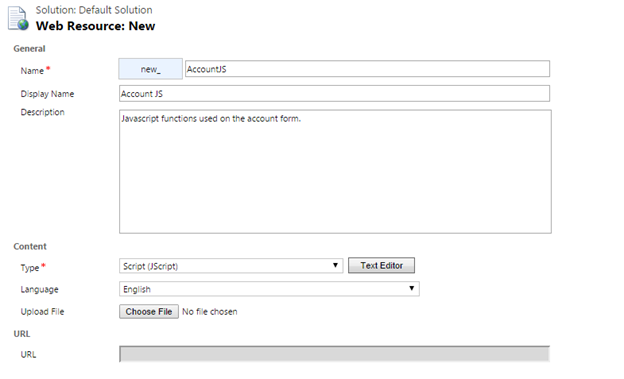
  8. Give your new web resource a meaningful name, and set type to "Script (Jscript)". In this example we will name the web resource "AccountJS". We can always add other functions to this web resource in the future if desired.


    Text Field Using JavaScript


  9. Next, press the text editor button. This opens up the editor where you will paste the actual javascript function.


  10. Here, we will paste the following function, and then press OK. If you look closely at the details of this function, you can see that the first line gets the value from the name field of the account record and saves it to a variable named accountName. In the second line, we add the http and domain around the account name, and save that to a variable named accountURL. Lastly, in the third line, we write the contents of the accountURL back into the account record, into the field named new_AccountURL. Example:


    function createUrl () {

    var accountName = Xrm.Page.data.entity.attributes.get("name").getValue();

    var accountUrl = "http://"+accountName+".mydomain.com";

    Xrm.Page.data.entity.attributes.get("new_AccountURL").setValue(accountUrl);

    }


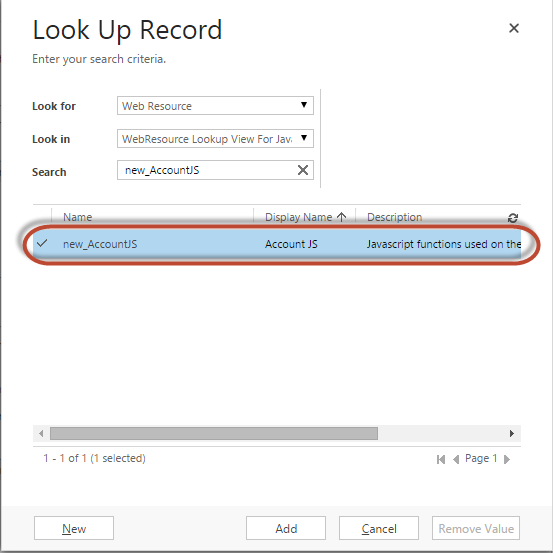
  11. Press save, then publish once more. Close out of the new web resource window. Now you should see your newly created web resource in the "Look up Record" window. Choose your new web resource here.


    Text Field Using JavaScript


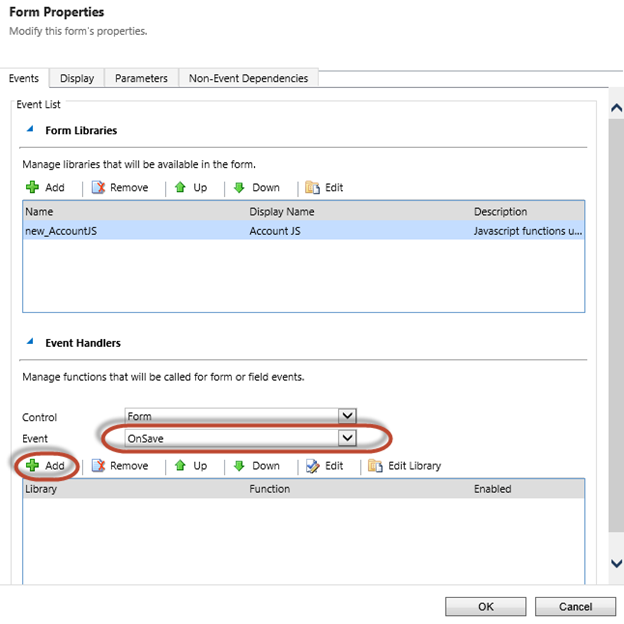
  12. Once you've added the new web resource to the form libraries, you can now add any function that's in that web resource to the form (currently we only have the one). In the event handlers section at the bottom, notice that "OnLoad" is selected. We'll change this to "OnSave", and then press add to add a new event.


    Text Field Using JavaScript


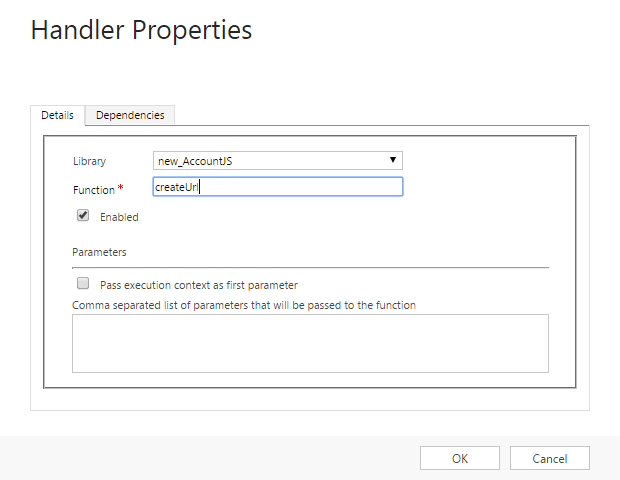
  13. Here make sure our library "new_AccountJS" is selected in the library drop down menu. Fill in the exact name of the function into the function field. In this case it was "createUrl". Press ok after you have done that.


    Text Field Using JavaScript


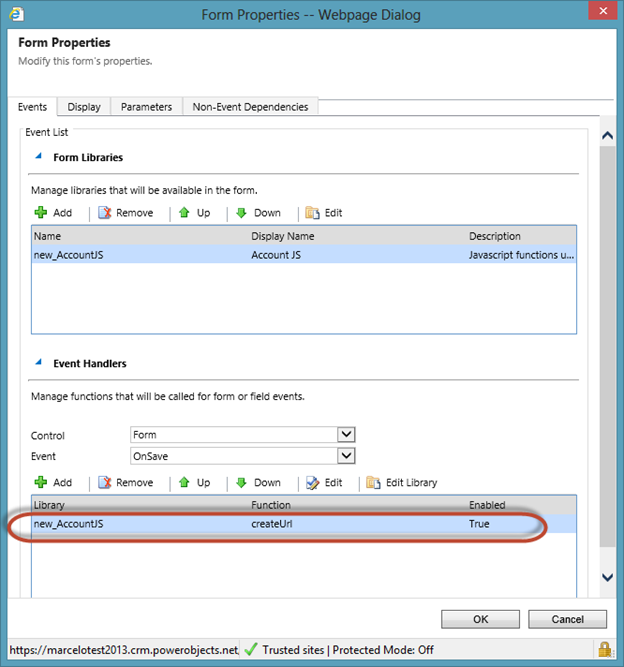
  14. Now you should see the new function "createUrl" set to run whenever the form is saved. Be sure to save and publish, and then press F5 to refresh the browser once again.


    Text Field Using JavaScript


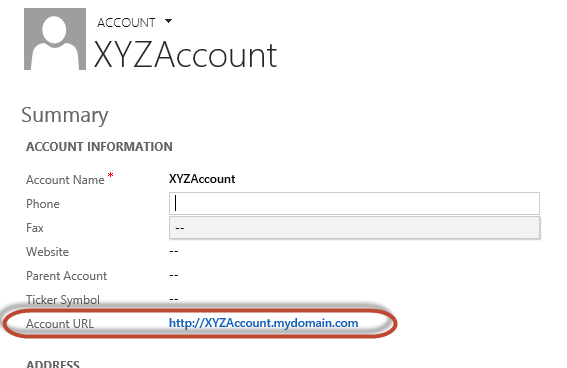
  15. Now, to test the new JavaScript function, we will open up any account record. Save the form (or let it autosave after making a change), and then look at the new field named "Account URL".


    Text Field Using JavaScript


    You can use this Account URL field in workflows or anywhere else where you need a url based on some other field on the form. If you found this helpful please check out our main Dynamics CRM blog page for other useful tips and tricks! Or try our CRM Book for all the latest in Dynamics CRM!

Joe CRM
By Joe D365
Joe D365 is a Microsoft Dynamics 365 superhero who runs on pure Dynamics adrenaline. As the face of PowerObjects, Joe D365’s mission is to reveal innovative ways to use Dynamics 365 and bring the application to more businesses and organizations around the world.

One comment on “How to Create a URL from a Text Field Using JavaScript in Dynamics CRM”

  1. Another method to create a URL is to create the new field for Account URL and make it a single line of text, Field type = Calculated, Format URL, and Under "Edit" in Calculated field make the Condition "IF" Account name Contains Data, Action "Set" = Concat("Url string",new_accountname, "Url domain")

PowerObjects Recommends