One of the many new features of the most recent Dynamics 365 release is Editable Grids. In today's blog, we'll review the details of this cool new feature. First, we'll define what Editable Grids are. Second, we'll provide step-by-step instructions for enabling Editable Grids, giving you the flexibility to add this new feature to any entity within the system. Third, we'll show you exactly how to use Editable Grids, including an overview of key features. Note that while there are many advanced features and capabilities with Editable Grids, today's blog focuses on an introductory overview of the configuration and functionality. Ready? Let's go…
Part I: Defining Editable Grid
This new feature allows for much greater flexibility around making in-line updates to records without the need to directly open a record. Editable grids are configured using the custom controls functionality introduced in Dynamics CRM 2016. Once added to an entity, editable grids initially seem just like the standard views of the past, but there's an important difference: it is possible to make updates to records directly from the grid!
This new feature allows enhanced efficiency when navigating CRM: the ability to modify information for a record without needing to jump directly into that record can dramatically reduce the time it takes to make large numbers of updates.
Part II: Enabling Editable Grids
Once you've determined you want to try this cool new feature, you'll need to enable editable grids in your environment at an entity level. Here's how:
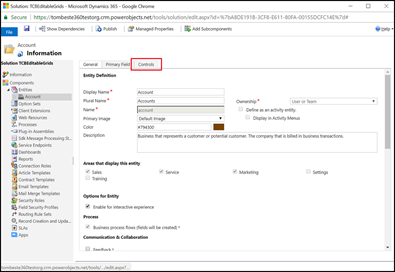
Start the process by navigating to your Solution from Settings, add the required Entity, and jump to the "Controls" tab:
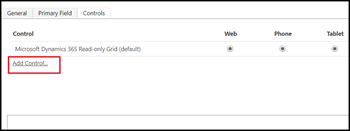
On the "Controls" tab, click Add Control…�
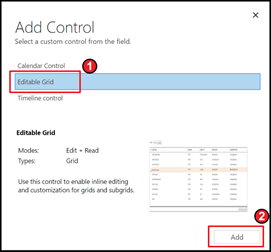
In the "Add Controls" window, select "Editable Grid" and click Add:
You're now back on the "Controls" tab, where you can continue to configure the display settings and properties of the newly-added Editable Grid:
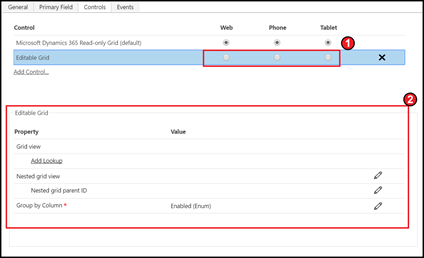
Choose to display the Editable Grid on Web, Phone, and/or Tablet platforms.
Configure the properties of your Editable Grid.
By default, the Editable Grid will display the columns and information defined in the view currently being used. But you can change that! Here, you can configure how the grid will handle lookups (using "Add Lookup," as shown in Step 6), define a "Nested grid view," and determine whether to enable grouping (using "Group by Column," as shown in Step 8):

Note that "Nested grid view" only applies to the Phone platform – because of this limitation, it is not covered in this blog.
When you click on Add Lookup, you can configure the lookups to show only related records or records specific to the Add Lookup properties:
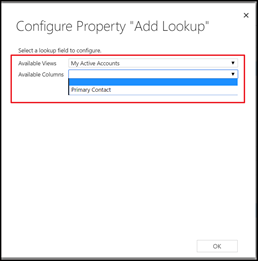
Begin by selecting the view on which you want to configure lookups from the "Available Views" field.
After selecting a view, choose the lookup from the "Available Columns" field. In the example above, Primary Contact will be configured in My Active Accounts.
Once the initial properties are determined, you can further define the types of records that will display when searching through the lookup on the grid:
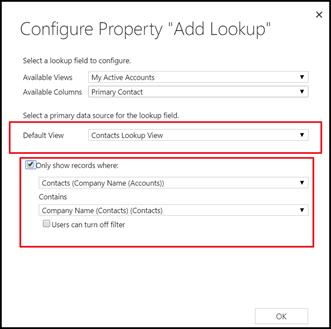
The "Default View" you select is the initial filter that determines which records will display when using the lookup.
If you check the "Only show records where:" box, you can further define the types of relationships that the lookup will filter. Additionally, you can give users the flexibility to turn the filter off by checking the "Users can turn off filter" box.
Another great new feature with the Editable Grids is the ability to further group the records in the grid. You can enable or disable this feature by changing the "Group by Column" setting:

Once all of the settings are configured for your new Editable Grid, save your solution and publish the customizations:
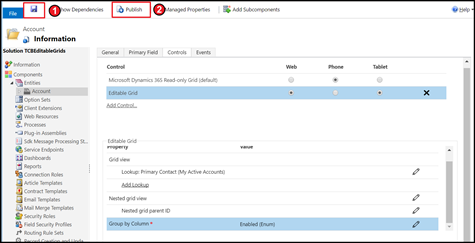
Note that while the Editable Grid is now configured, it will not go into effect until you completely log out and log back into the environment or refresh your browser
Part III: Using Editable Grids
At first glance, your newly-enabled Editable Grid will look quite similar to the view you're used to from previous versions. However, upon closer inspection, there are many differences, which are described below.
On the ribbon, there is now a "Show As" option that can be changed between the Editable Grid and a Read Only version:

There is a "Group By" feature that defaults to "no grouping," though clicking on it allows users to further group the records in a manageable format:

Clicking once on any piece of information within the record will enable in-line editing, allowing users to make changes directly from the grid – without having to open the record!

Edits to lookup fields are made using the settings defined in the Editable Grid's properties. This is a fantastic feature that has many uses.
For example, your organization can prevent users from looking up all contacts within the system, instead limiting them to only those contacts they follow.
Additionally, after a contact is selected, you can jump directly into that record by clicking the blue arrow:

Note that after making a change, you must click the "Save" icon, on the grid, as changes are not automatically saved:

To summarize the new features:
Editable Grid vs. Read Only Grid
Grouping
In-line editing
Lookup Filtering
And that, friends, is pretty much everything you need to know about the basics of Editable Grids. Happy CRM'ing!
 How Microsoft Power Platform is helping to modernize and enable...
 Deliver an Extraordinary Omnichannel Experience
 Data Interoperability Key to Improving the Patient Experience


