Unified Service Desk, lovingly calling USD, is Microsoft's latest and greatest call center streamlining application. It serves as a wrapper for your CRM solution by adding functionality while utilizing the power of CRM. In today's blog, we will give you a few tips and tricks for beginning and testing USD configurations as well as showing you how to make an external website accessible in USD. There's a lot to cover today so let's get started!
Beginning and Testing USD Configurations
The focus here is to begin configuring USD, so as a starting point, please deploy USD to a CRM instance and install the USD Desktop Client so that you can test your configuration as a USD end user. USD samples will deploy with data, however, this blog covers building USD from scratch. We will take you through some of the groundwork required to begin basic USD configurations, but these steps will not result in fireworks at the end. However, we promise that once you get the foundation down solid, you can really start to roll!
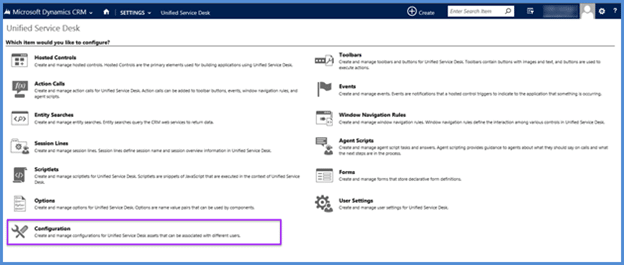
The first step is to create a configuration, which is pretty easy because all you need to do is give it a name. In CRM, navigate to Settings USD Configuration. Depending on your security model, USD configurations are typically built for agents, managers, and potentially teams.
We've named ours "Call Center Agent." Think of the configuration as a bundle. The configuration bundles together the USD records you create and places them into the configuration, which allows you to have one configuration for a particular team of agents and a different configuration for another team. If a USD record is not related to a configuration, you will not be able to access this functionality as an USD end user.
After you've created your configuration, it's time to get rolling on creating hosted controls – the building blocks of USD. Begin by creating the Connection Manager and Global Manager hosted controls. These are essential to your configuration as they are required. It may also be a good idea to throw in the Debugger to help with testing in the future. In addition, create hosted controls that will serve as the containers into which we will later place functionality including: Main Toolbar Container, About Toolbar Container, and Agent Script Controller. Lastly, create hosted controls for CRM pages. These will house your CRM forms. We've created a search page, where we will populate various entity searches and a contact page to open the contact form within.
| Hosted Control |
Purpose (display group location)
|
| Connection Manager |
Manages the connection between the Client Desktop application and the USD configuration assigned to the user logging in to USD.
|
| Global Manager |
Serves a coordinating role within the configuration, this is the workhorse of hosted controls.
|
| Debugger |
Creates a tab to house the debugger results in the main window. This powerful troubleshooting tool will not be used by end users, but allows troubleshooting to occur from within the desktop client.
|
| Main Toolbar Container |
Creates the top left panel which will house buttons.
|
| About Toolbar Container |
Creates the top right panel which will house buttons, typically including the debugger.
|
| Agent Script Controller |
Creates the left side panel which will house the agent script.
|
| Session Lines |
Enables naming the Session Tabs and provides the session overview in the top left of the agent script controller.
|
| Session Tabs Control |
Enables tabs for different sessions.
|
| Search Page |
Creates a tab to house your search functionality in the main window.
|
| CRM Page |
Creates a tab to house CRM forms in the main window. Create a hosted control for each CRM form agents will need to access with regularity.
|
This is not an exhaustive list, but it gives you a strong foundation. Create these hosted controls by following the specifics in the screenshot below:
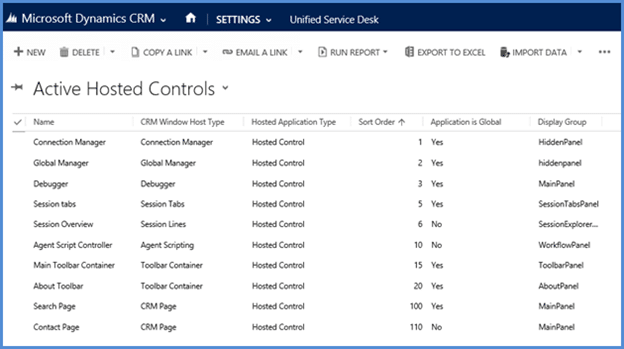
Some notes on hosted controls:
- Notice the different Window Host Types. Specific actions and UII actions are attached to Window Host Types. We won't build any of those out for right now, but this will inform your options in the future.
- The order, which we have sorted by here, matters in some circumstances and does not in others. Here we've placed the Connection Manager and Global Manager as 1 and 2 since they are required. It is best practice to space out order numbers so that if you find a need to run or add another record before or after the one already developed, you have room in the order to do so. Order tells USD in what order to open the various hosted controls or the left-to-right order of toolbar buttons.
- Global refers to whether or not a hosted control is available outside of a session. If a hosted control is global, it may be accessible at any time. If a hosted control is local, it will only populate within a session. Please note that in the above hosted controls, only the agent script controller and a contact form are session-based.
- Display groups refer to where in the USD interface the hosted control will populate. The required hosted controls rest on a hiddenpanel; toolbar containers are created to hold toolbars that exist outside of the default toolbar container in each hosted control (generally along the top and bottom of the USD interface); the mainpanel is generally reserved for CRM pages, external websites, or integrated applications; the workflowpanel is where session information will populate, including the agent script and answers, as well as any knowledge base or chat features.
When creating USD records, it is best practice to associate each record to a USD configuration. We titled ours "Call Center Agent." You must do this for each of the above hosted controls
1. First, create the connection manager hosted control.
2. Second, navigate to the related records carrot, and select Configuration.
3. Within the Configuration entity, select your configuration, created at the beginning of the blog, using the lookup field. Complete this procedure for each record created, ensuring that all records are associated. If you go into the USD Desktop application and don't see expected functionality, always check to see if it's been added to the configuration as a first trouble shooting step.

How to Test Your USD Configuration
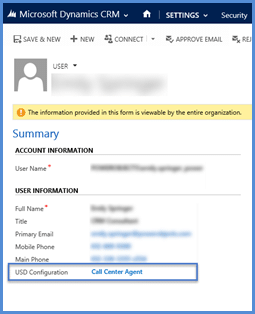
As a precursor to this, you should have installed the USD Desktop Client to your machine. When you deploy USD to a CRM instance, it installs numerous USD-related entities and fields. A field on each user profile is created titled "USD Configuration." This will be blank unless you assign the user a USD configuration (which we built as a first step above). Each user may only have one USD configuration. It is very important to assign users a configuration. Otherwise, they will log in to USD and receive all configurations, resulting in instability and unexpected behavior.
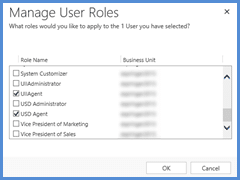
1. First, assign the test user the USD configuration (really, the bundle of USD records you configured) and assign the user the USD Agent and UIIAgent security roles.
2. Now, click on the USD icon on your desktop and enter your credentials. You'll see a blank USD, but congrats, you've successfully created a base USD configuration to build upon!
With your hosted controls you can now:
- Create an agent script with answers.
- Load a search page upon USD start up.
- Create toolbars with buttons.
- Link a debugger button to access the debugger functionality.
How to Make an External Website Accessible in USD
Do you want to expose an external website within USD? Give your agents access to a search engine?
Before we jump in to configuring USD to display an external website, you'll need to create a configuration and assign it to a user, configure foundational hosted controls, and create the Main Toolbar panel, where we will be placing access to the website. You cannot accomplish this without having completed the work outlined in the first part of this blog. Throughout this process, we need to remember to associate each created record to the Configuration in our CRM solution. If we do not associate the record, the end user, accessing USD through the Desktop Client, will be missing out on our hard work!
The steps in this section demonstrate how to create a button on the main toolbar that will navigate to the PowerObjects blog. We will accomplish navigation via a button on the Main Toolbar using four steps:
1. First, create a hosted control to house the external site. In CRM, navigate to Settings à USD à Hosted Controls. Select the USD component type as Standard Web Application.
If you were to allow multiple pages, USD would provide a page drop down for users to navigate back to sites they had already visited. However, keep in mind that this will use up memory on the computer. Remember, when USD populates external websites, it does so without providing typical browser navigational abilities. The purpose is to route end user behavior towards crucial information, but also means that any USD design must consider how agents will navigate through the pages. By making the application global, the hosted control will persist irrespective of the session. Lastly, the hosted control will display in the main panel in USD where CRM pages will typically populate.
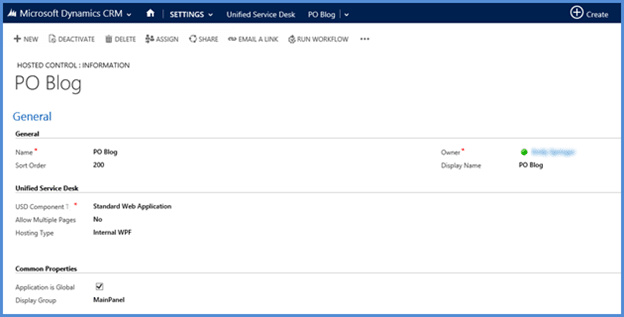
Don't forget! Before we move on to the next step, we need to follow best practices and be sure to associate the record we just created to our configuration!
2. Secondly, create an action call for the hosted control to navigate to the desired URL. Name the action call appropriately.
Depending on your business needs, by the time your configuration is complete you may have a long list of actions calls. We recommend creating a naming convention and being consistent. Here, we've listed the hosted control name followed by the action and to where it will go. The Action tab is where the magic happens. Select the hosted control you created in step 1. Then, depending upon the type of hosted control, associated actions (UII actions owned by the hosted control and determined by the host type) will be available for you to select. In this case, we want to tell USD to navigate to a website, so select Navigate. Lastly, we need to tell USD where to navigate to. In order to do this, enter "url=" followed by the desired URL.

Before we move on, what do we need to do? Why, associate the action call to the configuration of course!
3. Next, create the button to launch the site from the main toolbar. In CRM, navigate to USD à
Toolbars. You should have already created the main toolbar. Open this record and select + on the buttons sub-grid. Enter the information to create the button and then name the button a common sense name and determine the button text to display in the toolbar. The order value allows you to determine the button order from left to right once you have multiple buttons.
Notice that Show Tab is a lookup to all hosted controls. Remember, hosted controls are your building blocks in USD, so it's important to build these first. Actions and events perform tasks for hosted controls. By selecting the PO Blog hosted control, we are telling USD that upon click of this button, populate the PO Blog hosted control in a tab.

Pop quiz: What's the next step? Why, associate the button to the configuration of course – but wait! There's no option to associate the button to the configuration. This is because the button is associated to the toolbar and the toolbar is associated to the configuration.
If we stopped here, upon clicking the Search Blog button, USD would populate a tab titled "PO Blog" but the panel would remain empty. That's because we're not finished until we associate our action call to the button.
4. Finally, add the action call to the button. In order to do this, remain on the button record. After saving, the Action sub-grid becomes accessible. Click on the + to associate an action to the button. You'll see that the action created in the third step is available in the actions lookup. Select the action "PO Blog : Navigate to PO Blog".

Now head over to the USD Desktop Client and log in. You'll see a barebones USD with Search Blog as a button in the main toolbar. Select the button you created (1), watch USD populate the hosted control (2), and wait a micro-moment for the action to navigate to the given URL (3).
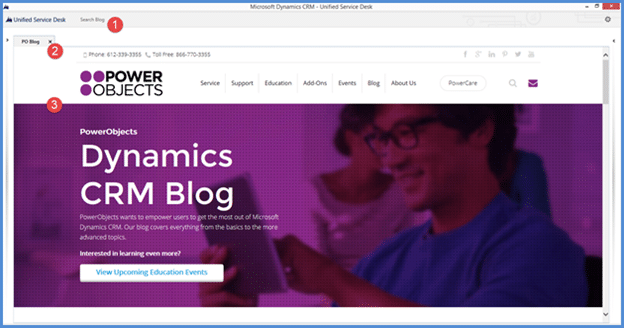
That's all folks! You can learn more about USD by checking out our website.
Happy CRM'ing!
 How Microsoft Power Platform is helping to modernize and enable...
 Deliver an Extraordinary Omnichannel Experience
 Data Interoperability Key to Improving the Patient Experience


