
How Microsoft Power Platform is helping to modernize and enable...
In this webinar, our experts showcase a variety of demo use cases of how different components of the...
Let's say you've made the switch to Office 365 (congrats—we think you'll like it!). Now you find yourself in the position of administering your new Office 365 account for your organization. Chances are that at some point you'll be adding users to Office 365. This post will walk you through how to do so within the Microsoft Online Services site.
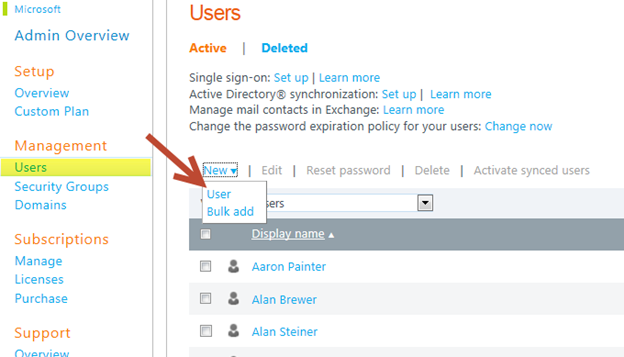
Step 1:
To add a user to Office 365, navigate to the Admin Overview screen and click Users on the left side. Then click New and choose User.
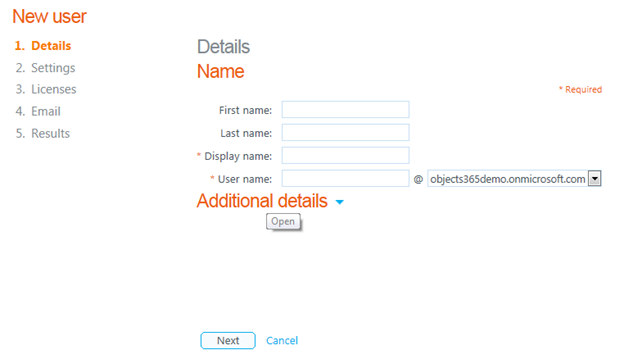
Step 2:
Fill in their name, the name you want displayed to everyone, and the user name (for example, if you wanted to make dan@yourcompany.com
(your company being the name of your organization), you would simply put dan in the User name field. Then choose your organization from the drop--‐down list next to the User name field.
Step 3:
On the next page, you need to decide if the new user you are adding requires administrative access to your company's Office 365 setup (allowing them to access and control your Office 365 setup), and whether they can administer any companies you may support through Office 365. For most users, it is recommended to choose No for both. You also need to choose the country the user resides in from the drop--‐down list. Once you are satisfied with your choices, click Next.

Step 4:
What you see on this next page is determined by what plan you have. This page allows you to enable your new user to use programs like Microsoft Lync, Microsoft Office 2010, and Dynamics CRM Online, depending on the licenses you have access to from the 365 plan you purchased.

Step 5:
Select the applications you want your user to have access to (if any) and click Next. Note: These can be added later if desired. The next page allows you to send the email address and the temporary password Office 365 will create for your new user to another email address. This is useful if you wish to save this information for a later date, or if you are adding a user that already has an external email address and you wish to notify them of their new Office 365 account. Note: You can uncheck the Send Email box if you do not wish to send the temporary account information to another email address.

Step 6:
To conclude, click on Create. The final page will show the new email address you created and the temporary password for that account. It can now be used to login to Office 365, and can receive and send email, as well as access any associated Microsoft applications. Click Finish to return to the Users page.
Voila! Now you know all about adding Office 365 users.
If you haven't made the switch to Office 365 yet and are looking for help in your transition, PowerObjects offers Office 365 migration services. We're also happy to answer any questions regarding making the switch. Feel free to reach out to us for more information.
Happy CRM'ing!


