
How Microsoft Power Platform is helping to modernize and enable...
In this webinar, our experts showcase a variety of demo use cases of how different components of the...
When people visit your website and subscribe to your newsletter, are you exporting data from one system and importing it into another? Exporting from your email service provider and importing into your CRM or some other system? What if someone signs up 10 minutes before you send out your newsletter? Wouldn’t you want them to receive the newsletter you are about to send?
By combining the Microsoft Dynamics CRM add-ons PowerWebForm and PowerMailChimp, you can now automatically create a list of people to send your newsletter.
How, you ask, can this be done?
Once you’ve built your web form in CRM and posted it to your web page (see PowerWebForm user guide for more details), you would create a dynamic marketing list that automatically pulls in all users who have filled out that particular web form. Every time someone fills out a web form, a web form activity is associated to that person in CRM, which makes it easy to pull together a list of those people. So, for example, everyone who has decided to subscribe to your newsletter using the “subscribe to newsletter” web form will automatically be pulled into this dynamic marketing list.
Note: The dynamic marketing list will automatically sync right before your PowerMailChimp blast (in this case a newsletter) is sent out. That way, no one is left out when your newsletter is sent out.
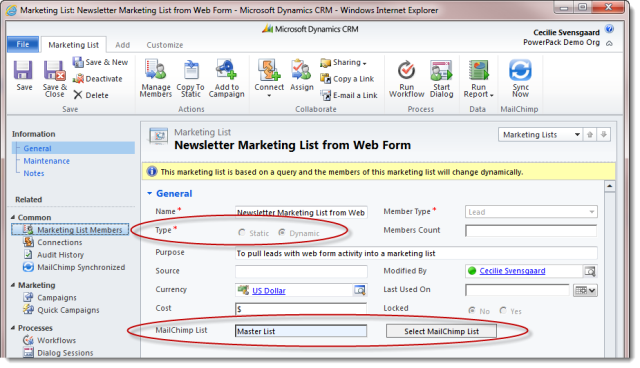
Navigate to your CRM, click on Marketing and Marketing Lists. Then click New. Set up your marketing list to be dynamic and select a MailChimp list to associate this marketing list to (see more details on how to set up your MailChimp account and user PowerMailChimp in the PowerMailChimp user guide).
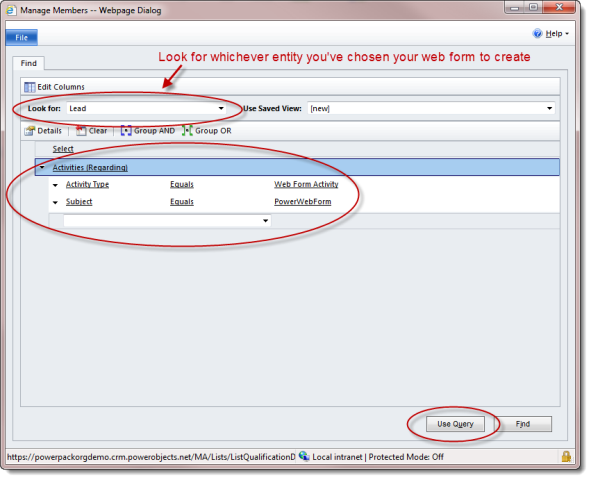
Go to “Add Marketing List Members” and set up your query:
Save and Close.
Navigate to the PowerMailChimp section of your CRM. Click on PowerMailChimp Blast and New. Fill in the required fields at the top , associate the Newsletter marketing list you’ve created (along with the other marketing lists you’d like to send your newsletters to) to the blast, select your template, and your newsletter is ready to go!

That’s the combined power of PowerWebForm and PowerMailChimp!
Happy CRM’ing!


