
How Microsoft Power Platform is helping to modernize and enable...
In this webinar, our experts showcase a variety of demo use cases of how different components of the...
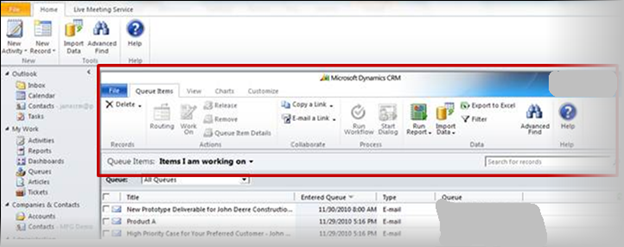
PowerObjects recently ran into an issue where the CRM 2011 client was displaying Activities, Reports, and Queues in an iFrame, rather than the new CRM 2011 look. The one thing in common was all the CRM 4.0 organizations that were upgraded from CRM 4.0 to CRM 2011.
Organizations that were not upgraded from 4.0 to 2011 work correctly in the same client.
This is a screen shot of the issue.
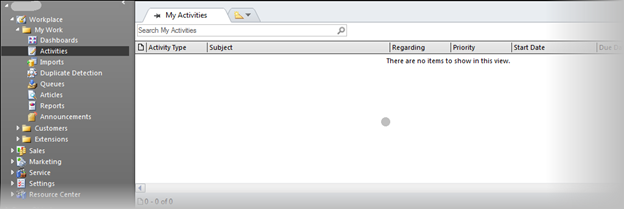
The following is a screenshot is after applying the sitemap changes.
We were able to determine what was causing this issue, as well as how to resolve the issue. The problem was indeed in the Site Map, particularly with the URL tags of the entities in question. We were able to both reproduce the issue in a clean environment, as well as resolve the issue in a broken environment, by updating those Site Map URL values. Below are the steps to resolve this for each of the affected entities:
Reports:
Within the Site Map, the following line exists:
Old value:
New value:
Queues:
For queues we see the following:
Old value:
New value:
Activities:
The issue with activities is the same as the one with queues, as the URL is incorrect. Currently this is listed as
Old value:
As updating the Site Map is different in CRM 2011 than it was in 4.0, We have also included steps below to make the change:
1. First, export the Site Map by going to Settings > Customizations > Solutions > New.
2. Create a new solution for the Site Map, and click Save.
3. From the Add Existing dropdown, select Site Map. Be sure to add required components if prompted.
4. Save your changes, and export the solution.
5. Extract the results and edit the customizations.xml file.
6. Zip the results and import the updated Site Map back into CRM. Note: If you are unable to import the solution, check to verify that it was zipped properly. The three .xml files will need to be at the root level of the .zip folder, as opposed to being held within another folder.
7. Publish customizations, restart Outlook, and the issue should now be resolved.
Right now we are going through and doing a ton of upgrades – we continue to learn and find little things that help us make the process go smoother for our clients. If you are looking for assistance please reach out as we have some fixed fee options for getting your organization migrated. You can contact PowerObjects and the CRM Expert here.
Happy CRM'ing


