
How Microsoft Power Platform is helping to modernize and enable...
In this webinar, our experts showcase a variety of demo use cases of how different components of the...
Recently, one of our clients was experiencing problems with one of their reports created via the Report Wizard within CRM. The client wanted to take advantage of SSRS' ability to schedule automatic report delivery via a 'subscription.' The client wanted to have a copy of this report emailed to the Sales Manager every Monday evening so it would be ready to analyze right away on Tuesday morning. (While the native CRM interface does not have this capability, we can easily enable a 'Push' report strategy using the Report Manager for SQL Server.) While the report was running beautifully and contained all the information they requested, we were running into some strange bugs with getting the actual e-mail to be sent. I am going to detail the entire process of ensuring that you properly set up automatic report delivery in an attempt that you do not have to experience the pains that I did!
1. Log Into Your Report Manager Website (http://[COMPUTERNAME]/reports)
-Note: [COMPUTERNAME] would be the name of the computer where Reporting Services was installed...If you are on the same computer where Reporting Services is running, you can type http://localhost/reports
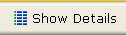
2. Depending on the architecture of your network, you could see one or more folders when you initially log into the site. The folder which contains all of the report from CRM will be located in the [YOUR ORG NAME]_MSCRM folder. Before clicking on this folder to open it, make sure you click the 'Show Details' button in the upper right hand corner of the page. If we don't, some key data will not be displayed to us.

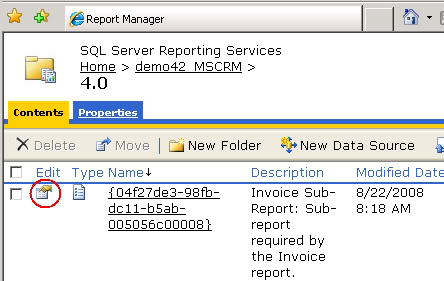
3. Inside the _MSCRM folder you will see a list of all the reports that are currently available from within CRM. Clicking on any of the report links will allow you to run the report directly from this web interface. This interface allows users to access their reports in another fashion. Go Ahead and click on the report you wish to schedule for automatic delivery. It's ok, I'll wait for you...
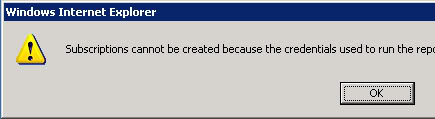
4. Click on the report link? Good...The initial screen that you see will be the 'View' Tab. It is from this Tab that our Report is displayed to us. We are not interested in viewing the report thought. We want to click on the Subscriptions tab. After we arrive in the subscriptions tab, we would like to select 'New Subcription'

5. Not so fast! We seem to have a problem...
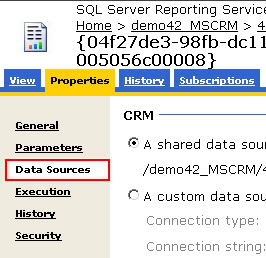
6. By default, the CRM report credentials are not stored. This is due to the fact that these reports are using a shared data source. Do not fret though as we have a solution for this problem. We want to click on the Properties Tab and then click 'Data Sources' from the left navigation column.
7. As you can see, by default, the 'Use Shared Data Source' option is selected. As was stated above, this option will not allow a subscription to be set up. We must select the second option, 'A Custom Data Source'. We must then type our connection string into the supplied text box. If you are unsure on how to properly configure a connection string, contact your system administrator. This connection string should reference the _MSCRM Data Source. PLEASE NOTE: We DO NOT want to type user name or password information in the Connection String. The text entered into this field is not encrypted and is stored in Plain Text. Should another user come along, they would have access to your personal login information.

8. We now must configure how credentials will be determined. We have several options to choose from so I will take the time to explain how each of the options below are different (as I was confused by them initially as well).
First, we have the option to have the user who is running the report supply the server with the appropriate credentials. This information would need to be entered each time the report is run. Furthermore, we can also adjust the text to display to the User to prompt them for their password. This is the most secure option, BUT, most users would not be pleased with a system that asks for their credentials each time a report is executed. This option may be appropriate when your organization's security policy fobids storing login information in anyway, but in most cases, there are better options.
Secondly, We have the option to have the 'Credentials Stored in the Report Server.' In this option, the user name and password are stored in the Report Catalog on the Report Server. The name and password are encrypted and are not visible from the Data Source Properties page. This option is the most convenient for the user because they will not need to enter a user name and password each time they wish to run a report. It also provides the required security for most situations.
There are two check boxes underneath this option that the user may or may not select. The first option, 'Use as Windows Credentials', when selected will treat the supplied name and password as Windows credentials. If this option is NOT selected, the system will treat the supplied credentials as a Database login.
The Second Checkbox, 'Impersonate the Authenticated User After a Connection Has Been Made to the Data Source' allows the data course to use these credentials to impersonate this user. Not all database servers support this type of delegation of credentials so be sure that your specific Database Server can support this functionality if you choose this option.
The Windows Integrated Security option is not recommended. First, it will not provide the adequate credentials we need to set up a subscription. Also, and perhaps most importantly, there are issues with authentications of more than 'one hop.' To get integrated security to work across more than one hope a special kind of security known as Kerberos must be used. This is outside the context of this blog so this will not be dicussed.
After we have chosen the correct options and clicked apply, we should now be able to configure the Subscription Details.

9. Setting the subscription details are quite easy. We simply need to select who to send the report to, when to send it and what format to send it as. We have the option of providing a direct link to the report as well. The standard choices here are to use Web Archive to display the report or to send it as an attached PDF file. This section is extremely easy to use and is very analogous to creating a simple email.
FYI: Certain options such as SMTP Configuration and others can be adjusted via the rsreportmanager.config file.
That's it! If you are having problems with the report server running, make sure that the SMTP service is running on the report server. This was the issue for me, but once that was fixed, the reports were flowing!


