
How Microsoft Power Platform is helping to modernize and enable...
In this webinar, our experts showcase a variety of demo use cases of how different components of the...
PowerWebForm is one of our fantastic Dynamics CRM add-ons, which allows you to capture information from a web form and pull it directly into your CRM. But PowerWebForm has something that CRM doesn't; a multi-select field or a field that allows the user to select multiple checkboxes. In this blog, we'll discuss how to map this field into CRM properly so that is shows nicely in the CRM field.
The Scenario Let's say your business wants to collect lead information using PowerWebForm, and you want potential customers to indicate the products they are interested in. When leads fill out the web form, you want the product(s) selected to be show on the new lead record in CRM.

As you can see from the screenshot, the Lead specified in the web form that he was interested in Graded Stone, Rip Rap and Sand and this came into CRM as multiple lines of text.
How We Do It
Now let's look at how to set up PowerWebForm to achieve this result.
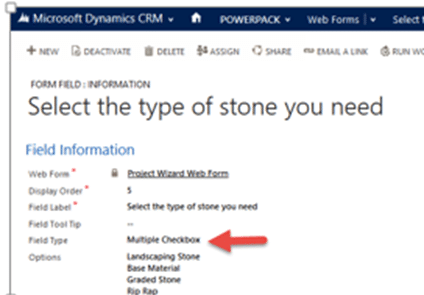
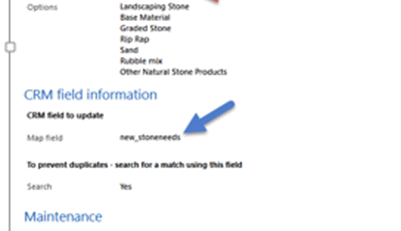
Note: Before you begin the web form design, create a multi-line field on your Lead record to hold the values from the webform. We have created a field called New_Stoneneeds, which has a field type "Multiple Lines of Text."
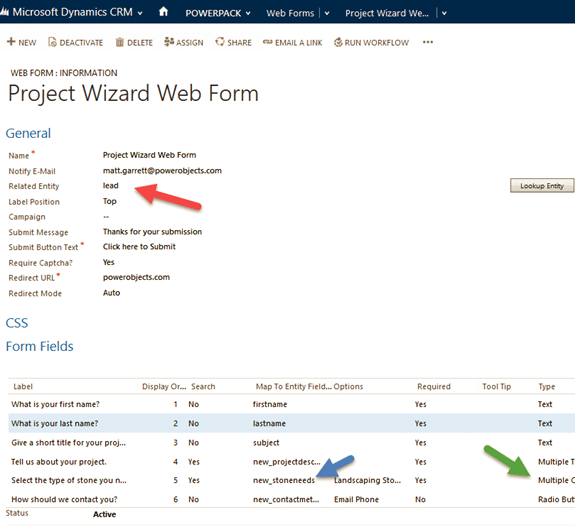
Once you hit Save on the Form Field and return to the PowerWebForm creation page, it should look something like this:
And there you have it. A simple way for users to select multiple options on a PowerWebForm and map that info into CRM. We hope this blog helped further your Dynamics CRM education!
Thanks for your interest in PowerWebForm. Should you have any questions, contact us at 612-339-3355 or email powerpackpro@powerobjects.com. Remember, your trial will expire 30 days from the date of installation. If you are interested in subscribing, go back to the configuration screen and change "try" to "subscribe" and enter your credit card information – you will be charged $1/CRM user/month.


Hi Joe - I was reading your article about multi selects and in following your instructions above, I get stumped at :Select the Field Type. Here you want to select the Multiple Checkbox option. Selecting this type will display the next field, Options. That is not an option for me, only option set. Any ideas on why the option is missing? I have the 2015 Online version.