
How Microsoft Power Platform is helping to modernize and enable...
In this webinar, our experts showcase a variety of demo use cases of how different components of the...
When a CRM 2011 organization is upgraded to CRM 2013, part of the upgrade process creates new forms for many of the out of box entities. The new forms are easy to identify as they're named after the entity, while the "legacy" Information form is still named Information. Microsoft has provided a method to "merge" your Information forms to the new forms. This post will discuss how we, as CRM professionals, handle the process of merging forms for our clients.
Before you do anything, it's important to consider why you should merge forms.
Perhaps the most important reasons to merge forms are to improve user adoption and to reduce the support demands on the staff who manage CRM. You see, the new forms only contain out of box fields for the entity and no web resources or event handlers. Users may be loading the new Account form, not recognizing the design or seeing the custom fields that were created for the Account entity in your organization, and decide that the upgrade has "broken CRM" making their first impression of CRM 2013 negative. You don't want that. You also don't want your support staff to field any number of calls that are resolved by asking the users to switch forms.
Some may be saying "Yes, well unused forms can be deactivated now, so that is not really a problem". Consider this: It's been suggested that future releases of CRM are going to require that form merges are completed. You wouldn't want to be under the gun to complete the form merges in a hurry so you can apply an update to obtain a fix or feature that your users really need.
So now that you see why form merges should be completed, let's reveal how we at PowerObjects handle them.
We've identified that the following entities that get the new form and therefore need the form merges.
It's rare to find an organization that has created records and/or customizations for all of these entities. For the entities that aren't in use it's really just most efficient to disable the Information form and move on.
We like to analyze what we need to do before doing it, so we make a quick spreadsheet to keep track of what we're doing.
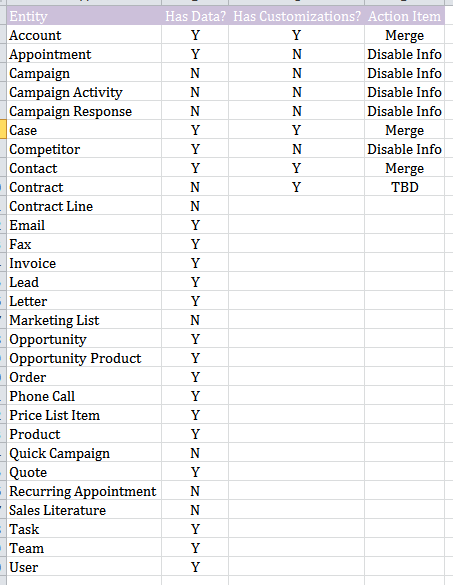
To determine if an entity needs a "Y" in the "Has Data?" column, just run Advanced Finds with no filters for each of the entities in the list. If there are records, indicate so with a "Y" for yes.
To determine if an entity needs a "Y" in the "Has Customizations?" column, open the Default Solution by clicking Customize the System tool in Customizations button under the Settings area of your navigation. There are a few ways to determine if customizations have been made to each entity. You could expand each entity, click the Fields area and change the View to Custom. If the results are empty, it's a good bet the entity form was not customized either.
We prefer to open the Information Form designer and check to see if there are any web resources listed under "Form Properties". Then we use the Field Explorer on the right, changing the Filter to "Custom Fields" and watching what happens when we uncheck "Only show unused fields". If your Information form has web resources listed and in use, you'll need to merge the form. The exception to this is web resources related to Activity Feeds which were added as a part of the CRM 2011 system.
When you find an entity that has no records but customizations were made, you'll need to do a little more digging: Were the customizations part of an experiment that never went beyond the lab? Are they meaningful now? Answering those questions will help you decide what needs to be done.
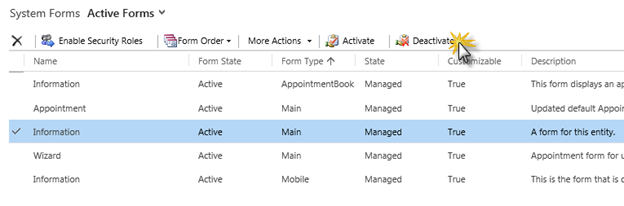
Since we love wrapping up things that are fast and easy, let's sort the Action Item Column and go after all of those entities where you're just going to disable the Information Form. Our Appointment entity is the first one on the list of "Disable Info" action items.
In the Default Solution, expand the Entities area, then expand Appointment and click Forms. Locate the form named "Information" with the Form Type "Main". Select it, and click the Deactivate button. Repeat for all of the entities where you just need to disable information form, then Publish All Customizations and you're part way done. Easy, right?
Now let's tackle those entities that need the forms merged.
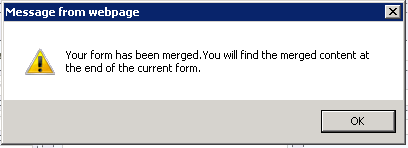
Open the "Account" form under the Account entity and you will see that it's both new and generic. We've got the new Map View, the new Social Pane, the new address field. All of these are kind of cool things that users may like, so let's plan to keep them. Note the two tabs "Summary" and "Details". On the top of the Form Designer ribbon you will see a button called Merge Forms. When you click that, you will be able to select our customized Information form. You'll also get this message.
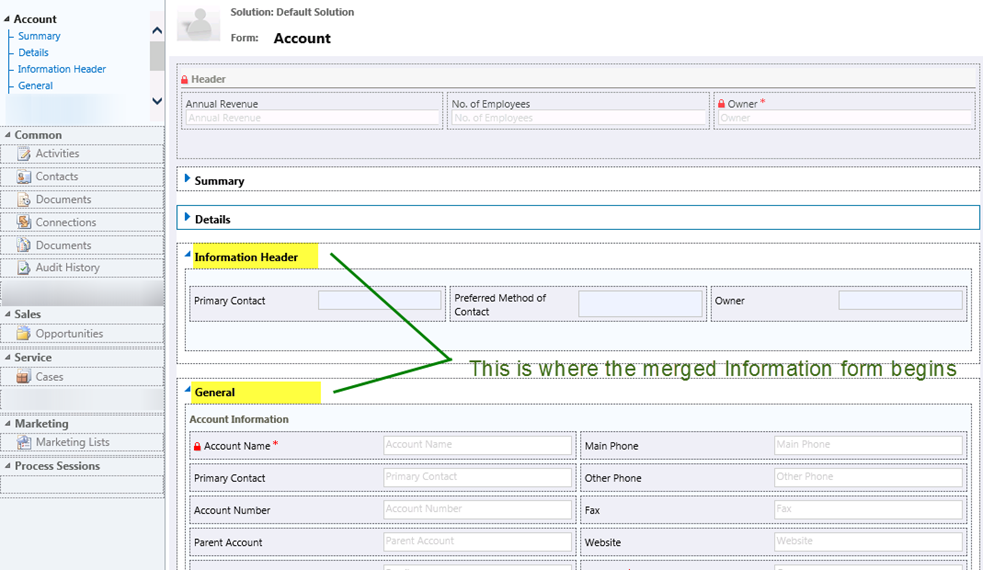
When the form is merged you will see that all of the tabs from the Information form have been added in, along with new tabs for the old forms' header and footer if those areas had fields in them. In addition to that, the merge has added all of your event handlers to our fields.
The first time you save the form after it has been merged you will see this message.
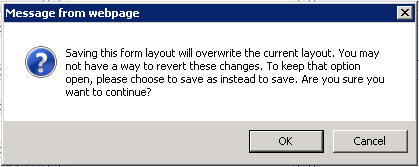
Since you're just updating the default form Microsoft gave us, you can click OK there.
Let's clean this form up some.
I like to start with the header and footer, and then delete those tabs from the form as soon as I can. Collapse the Summary and Details tabs so you can see both the form header and the tab named Information Header. Add the fields in the Information Header tab to the new form's header. Do the same process for the footer if there were fields in it on the other form. Save and then blow away the Information Header and Information Footer tabs.
Delete?!?! What are you, looney? What if…. Relax. The Information form is still there and has not been modified, so you can refer to it if you need to.
Now look at the General tab. On the Account this probably where you'll see the most overlap. Since we've decided to keep the Summary tab mostly intact, I'll want to move fields that are on the General tab up to the Summary tab and perhaps remove some fields from the Summary tab that your organization doesn't use, like Ticker Symbol. Maybe you can refer back to the spreadsheet and see if the subgrids on the Summary tab are relevant. If you don't use Opportunities or Cases, remove them. There will likely be a bit of overlap in the Details tab too, let's just clean up all of the duplicate fields and remove fields that are irrelevant to this organization. After all of this moving and rearranging you may be able to delete the General and Details tabs.
If you opt to keep the new social pane, you can also remove the old notes section and subgrids for activities and posts. You could remove redundant subgrids for contacts, opportunities and cases.
Most likely you're a CRM Admin familiar with the evolution of your CRM system. This is an ideal time to think about removing form elements that are no longer in use, or things that make the form too busy.
We've found a few things:
Once you have perfected the design of this form it's time to save it and deactivate the Information form. You already know how to do that from your fast and easy work above. If your information form used Security Roles, you'll need to set those up again to match. Publish your changes and give your new form a test run! Unless you've configured multiple forms you'll see that there is no longer a form selector.
Hopefully we've helped you through the important but often overlooked process for managing your CRM 2013 system. If you liked this post, maybe you'll like our post on Displaying Business Process Values on Forms. Thanks for checking in with us and remember... Happy CRM'ing!


