Looking for PowerObjects? Don’t worry, you’re in the right place! We’ve been part of HCL for several years, and we’ve now taken the final step in our acquisition journey: moving our website to the HCL domain. Nothing else is changing – we are still fanatically focused on Microsoft Business Applications!

PowerObjects Blog 

for Microsoft Business Applications


Creating a Ticketed Event in PowerZapEvent

Post Author: Joe D365 |

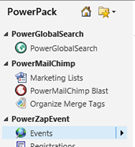
PowerZapEvent is a powerful add-on that integrates CRM with ZapEvent, an online event registration tool. At its core, ZapEvent allows individuals to register for events (paid or free). When tied with Dynamics CRM, it's super useful add-on for event administrators.

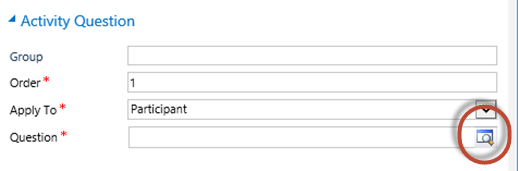
Normally in ZapEvent, all registrants must provide full contact information, including name, address, phone number, and so on, during the registration process. When setting up the event, the administrator can add additional questions—such as food preference—that registrants must answer. For detailed instructions on how to set up an event, you can reference the PowerZapEvent user guide.

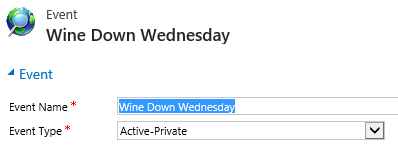
In today's blog, we'll walk you through a scenario where you want to allow guests to purchase multiple tickets at once, without having to enter contact information for each attendee. We'll be creating a fundraising event called Wine Down Wednesday to demonstrate how to do this.

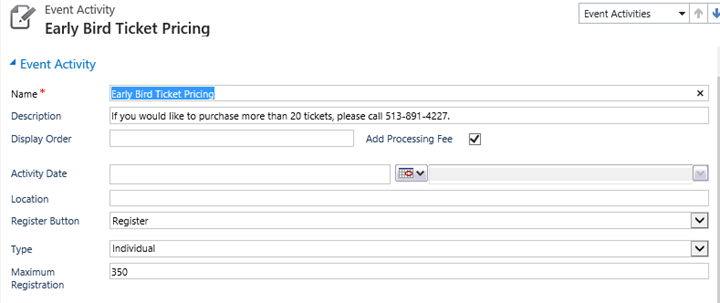
Wine Down Wednesday offers 3 online ticket prices: early bird (valid from 1/1/2014 to 4/15/2014 at 11:59pmm), normal (valid from 4/16/2014 12am to 4/29/2014 at 5:00pm), and sponsor a teacher (valid from 1/1/2014 to 4/29/2014 at 5:00pm). We will also offer a general donation field, so registrants can make a monetary donation to the cause. Let's get started…

First, Create the Event

  1. In CRM, go to the PowerPack area and click on Events.

    Creating a Ticketed Event in PowerZapEvent

  2. On the ribbon, click New.
  3. Fill in as many fields as you can. Required fields include Event Name, Event Type, Event Category, Info Box Title, Processing Fee Description, Event Start Date, Event End Date, Registration Open Date, and Registration Close Date.

    Creating a Ticketed Event in PowerZapEvent

  4. Click Save and Close.

(These are the same steps you will find in the PowerZapEvent user guide.)

Add Event Activities

Once you have created your event, you will need to add event activities. In this example, we need to create an event activity for each ticket price. For now, we are just going to create one.

  1. In the left navigation of the event record, click on Event Activities.

  2. In the ribbon, click Add New Event Activity.
  3. Name the event activity, setting your restrictions as needed. Note that Maximum Registrants does not count the number of tickets sold, but the number of registrations received. So if one person purchases 10 tickets, it will only count as one registration. Because of this, if event administrators put a limit on how many tickets may be sold, they will need to keep a close eye on the number of tickets sold via dashboards.

  4. Click Save.
  5. In the left navigation, click Activity Prices.

  6. In the Ribbon, click New Activity Price.
  7. Because we want to allow a user to buy a number of tickets, and not have to register each attendee, we need to set the Price as $0.00.
  8. Click Save and Close.
  9. This should bring you back to the event activity. In the left navigation, click on Activity Questions.
  10. In the ribbon, click on New Activity Question.
  11. Set the order to 1, and click Apply the Question to the Participant.
  12. In the question field, click on the lookup button, circled below. This will open a new window.

    ticketed_events_img

  13. Click on the New button at the bottom left of the new window.
  14. Set the type to Numeric Text, name the question, select if it is required, and fill in the ticket price in the Answers/Choices area.

  15. Click Save and Close.
  16. This will bring you back to the event activity. Save and Close the event activity.

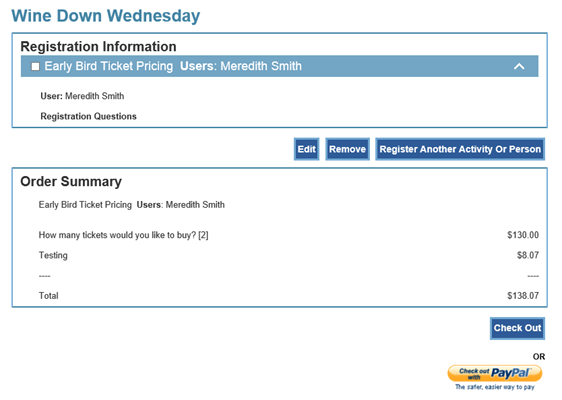
To verify that the event activity was set up correctly, on the event, go to Event Miscellaneous and click on Preview Your Event Page. Go through the Register Now process.

Note that when you type in the number of tickets you want to buy, the $65 (each) shows up automatically.

The order summary should reflect the cost of the tickets purchased:


You will want to add additional event activities for your other ticket prices the same way.

If you're not already using PowerZapEvent, I hope this inspires you to give it a try! You can learn more and download this add-on for CRM here.

Happy CRM'ing!

Joe CRM
By Joe D365
Joe D365 is a Microsoft Dynamics 365 superhero who runs on pure Dynamics adrenaline. As the face of PowerObjects, Joe D365’s mission is to reveal innovative ways to use Dynamics 365 and bring the application to more businesses and organizations around the world.

PowerObjects Recommends